Home Sweet Home

Recently I’ve been feeling very grown up as I have officially moved out of the family home. This of course means I have to pay bills, learn the colours of the recycling bins, keep the place clean….but more importantly stock the kitchen. After living for two days without a fridge (it was incredibly depressing) our kitchen is now so well stocked, it’s hard to believe there are three novice renters living in it. We have an extraordinarily large collection of glasses and sharp knives (all three of us seem to own them somehow..), very few saucepans and crockery and of course my contributions, the kitchen aid, magimix, and chocolate moulds. There’s the three piece tea set, the wine rack, the canapé spoons, in fact all the essentials for a first time home really… Some might say that I don’t have my priorities straight, they certainly won’t be invited round to dinner any time soon! To christen this little haven, I headed round to my new favourite place, our local Aldi, to gather supplies for a meal for the new inmates. It was only when I’d cooked half of it that we realised the kitchen table Claire Balding and Mark Francis had been trying to put up in the corner was missing two legs, so it was a feast, eaten off a mini chest of drawers….

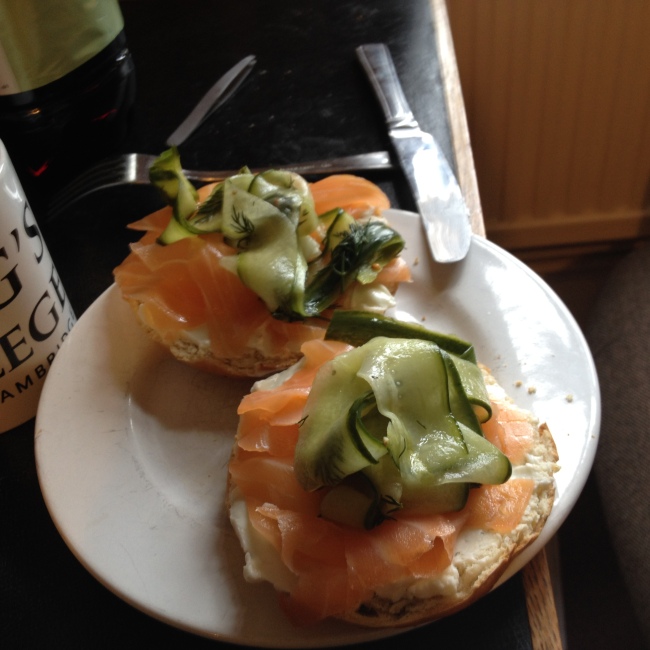
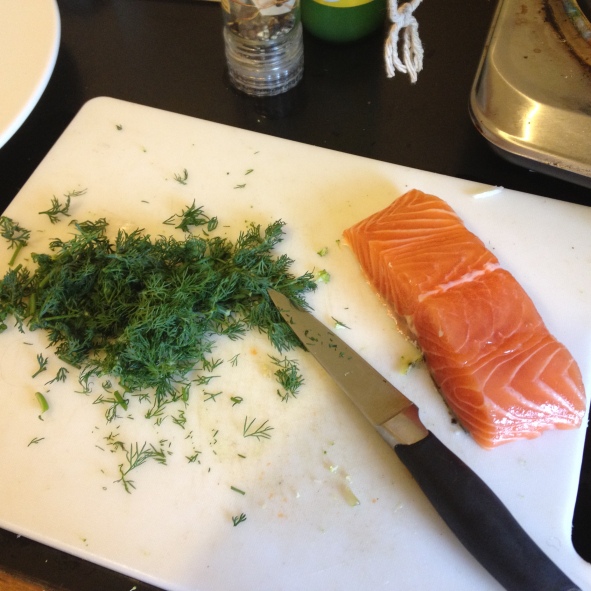
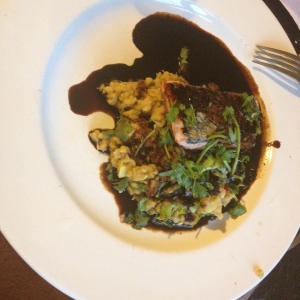
I’m still going through the avocado obsession faze, so for the starter I decided to make tortilla baskets, salmon ceviche and guacamole.

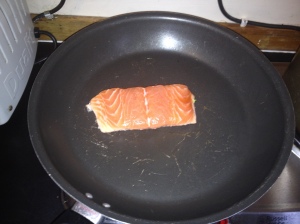
For the ceviche, I chopped 1/2 red onion, 1/2 red chilli, seeds removed,1garlic clove,a handful of coriander, 1 fillet of salmon, skinned and mixed them together with 1tsp olive oil,a large pinch of salt,black pepper and 3-4tbsp lime juice, to taste. Then I set it aside for about 1/2 hour in the fridge, during this time, the salmon turned a pleasing light pink colour ‘cooked’ by the lime juice.
Meanwhile, for the tortilla baskets, I divided a tortilla wrap into 4 quarters, and shaped each into a basket shape in a muffin tray. I baked them in the oven for about 8-10mins on high until golden and stiffened, then left to cool.
For the guacamole, I mashed 1 avocado with salt,pepper, small handful of chopped corianderand 1-2tsp lime juice.
Salmon in the basket, topped with guacamole and a coriander sprig, hey presto.

IMG_0169-0.JPG

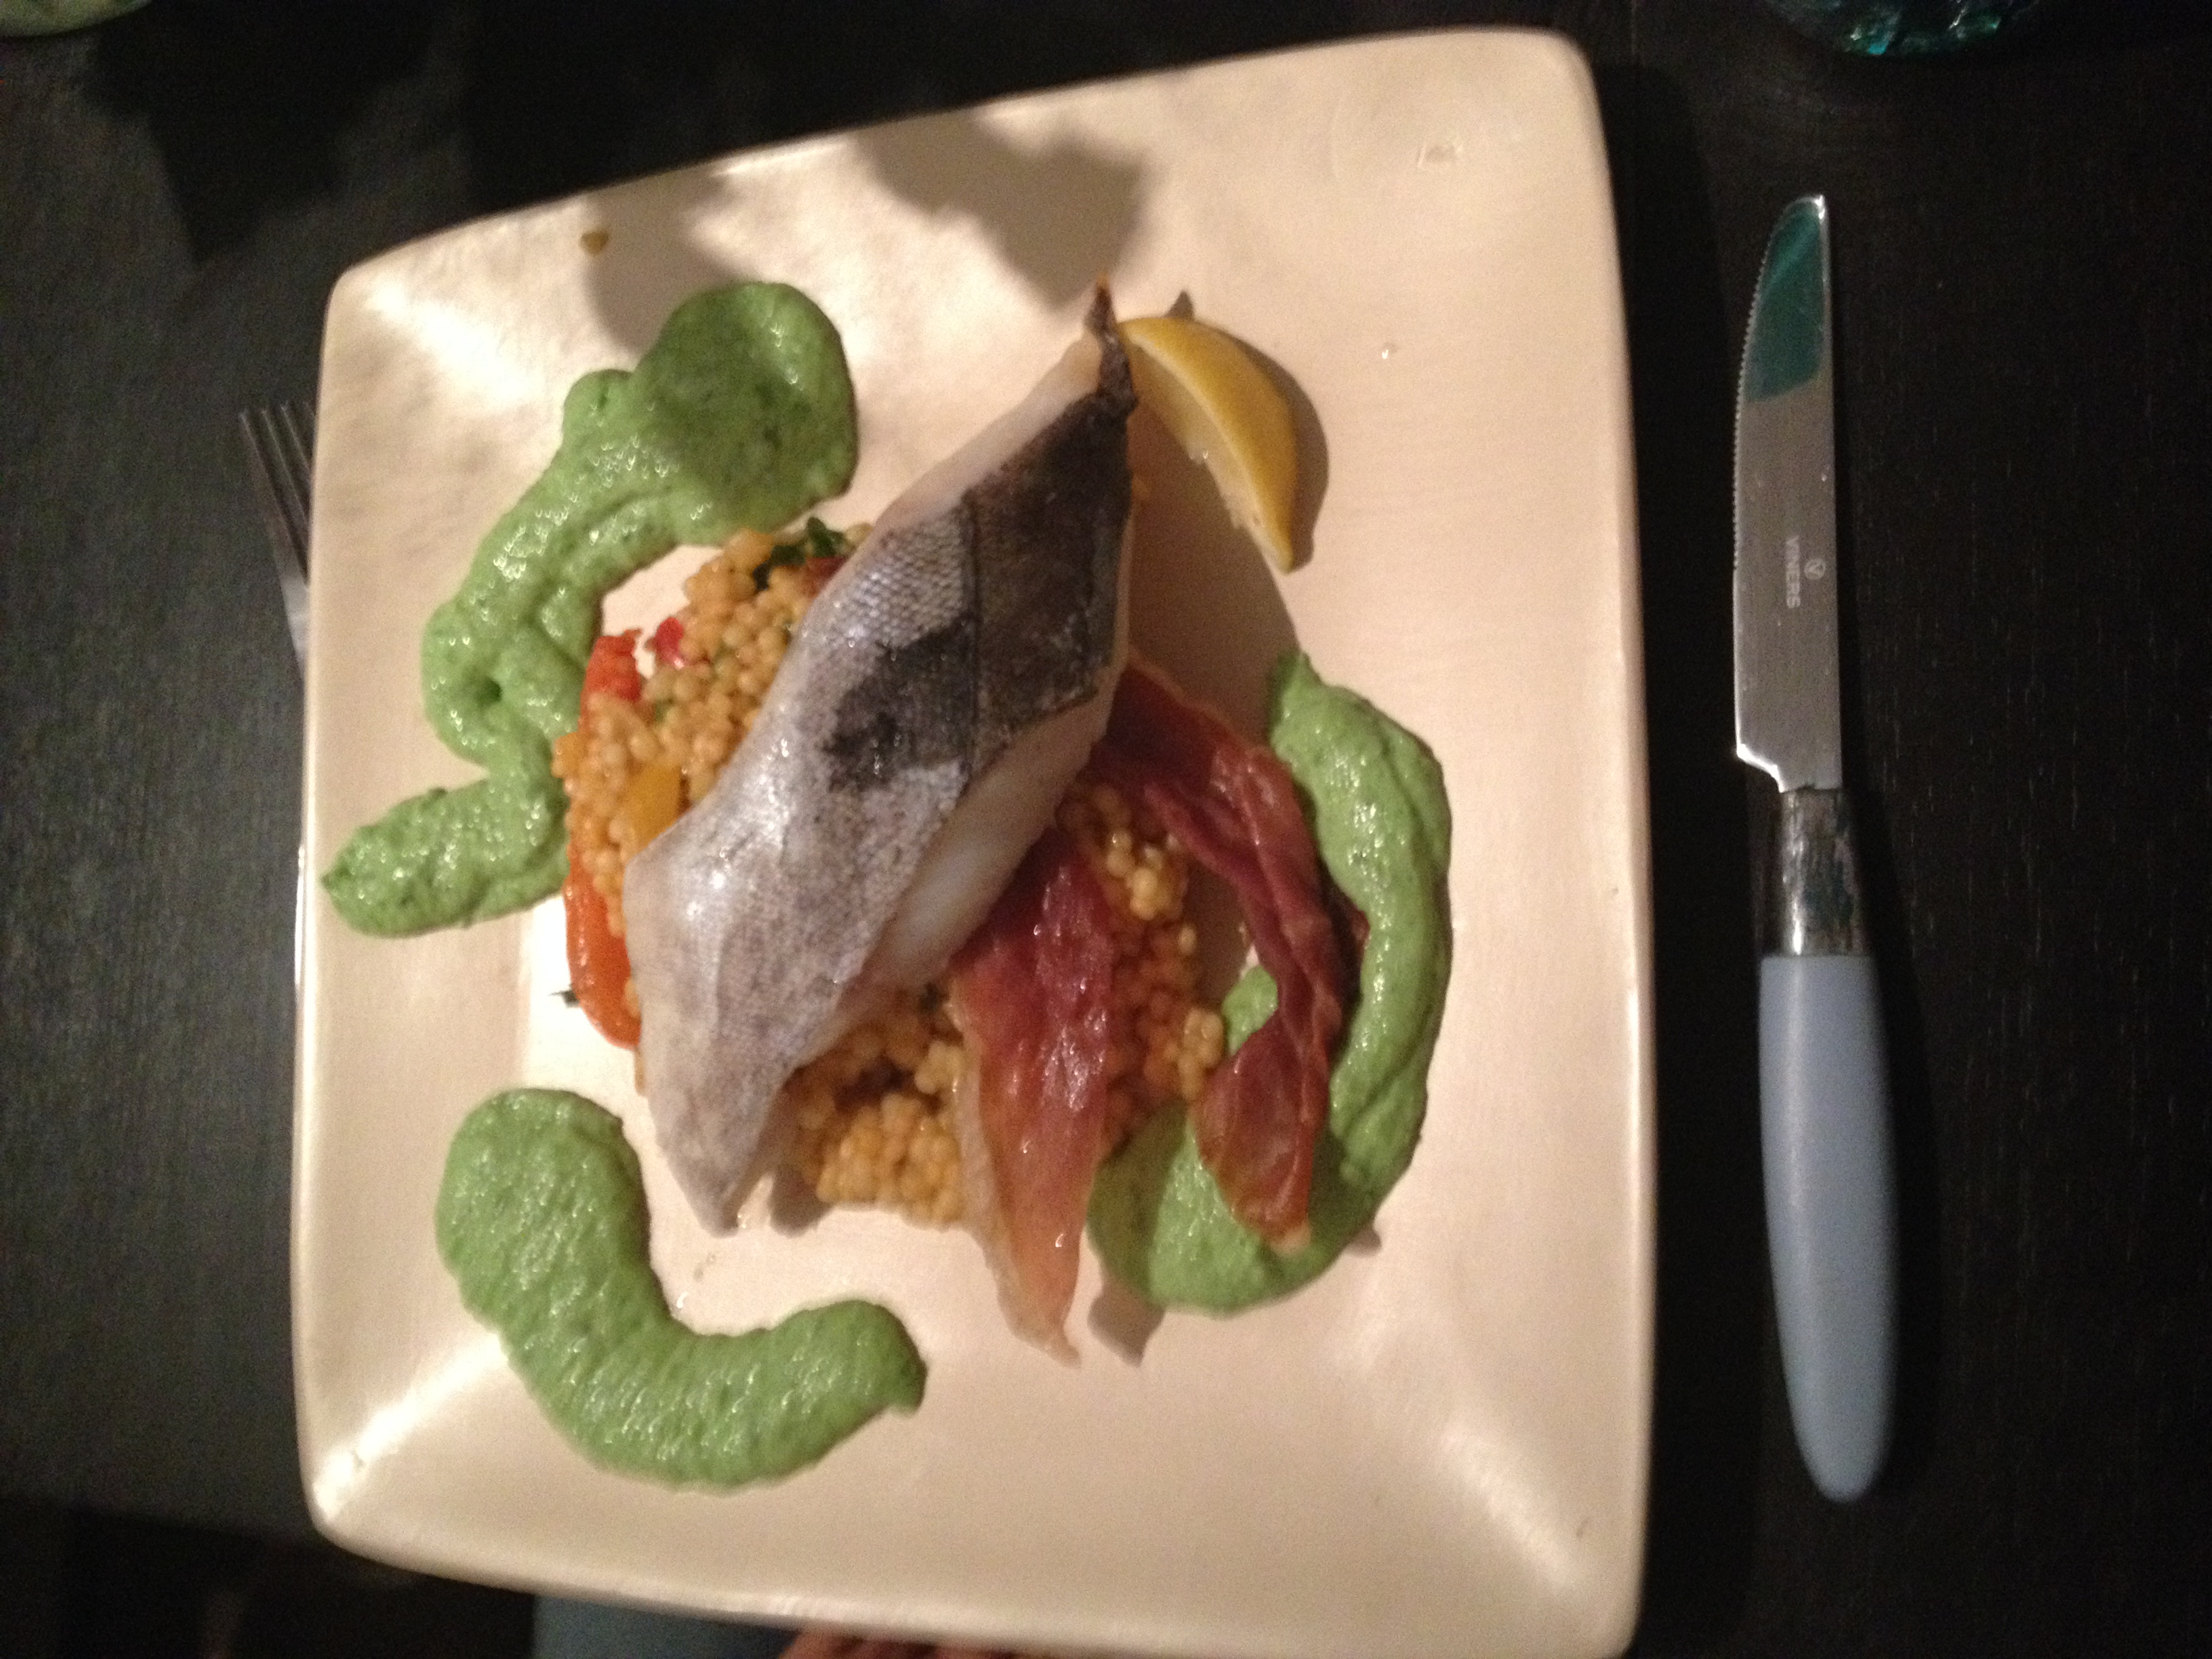
The main was slightly more complicated, I have never eaten Beef Wellington.

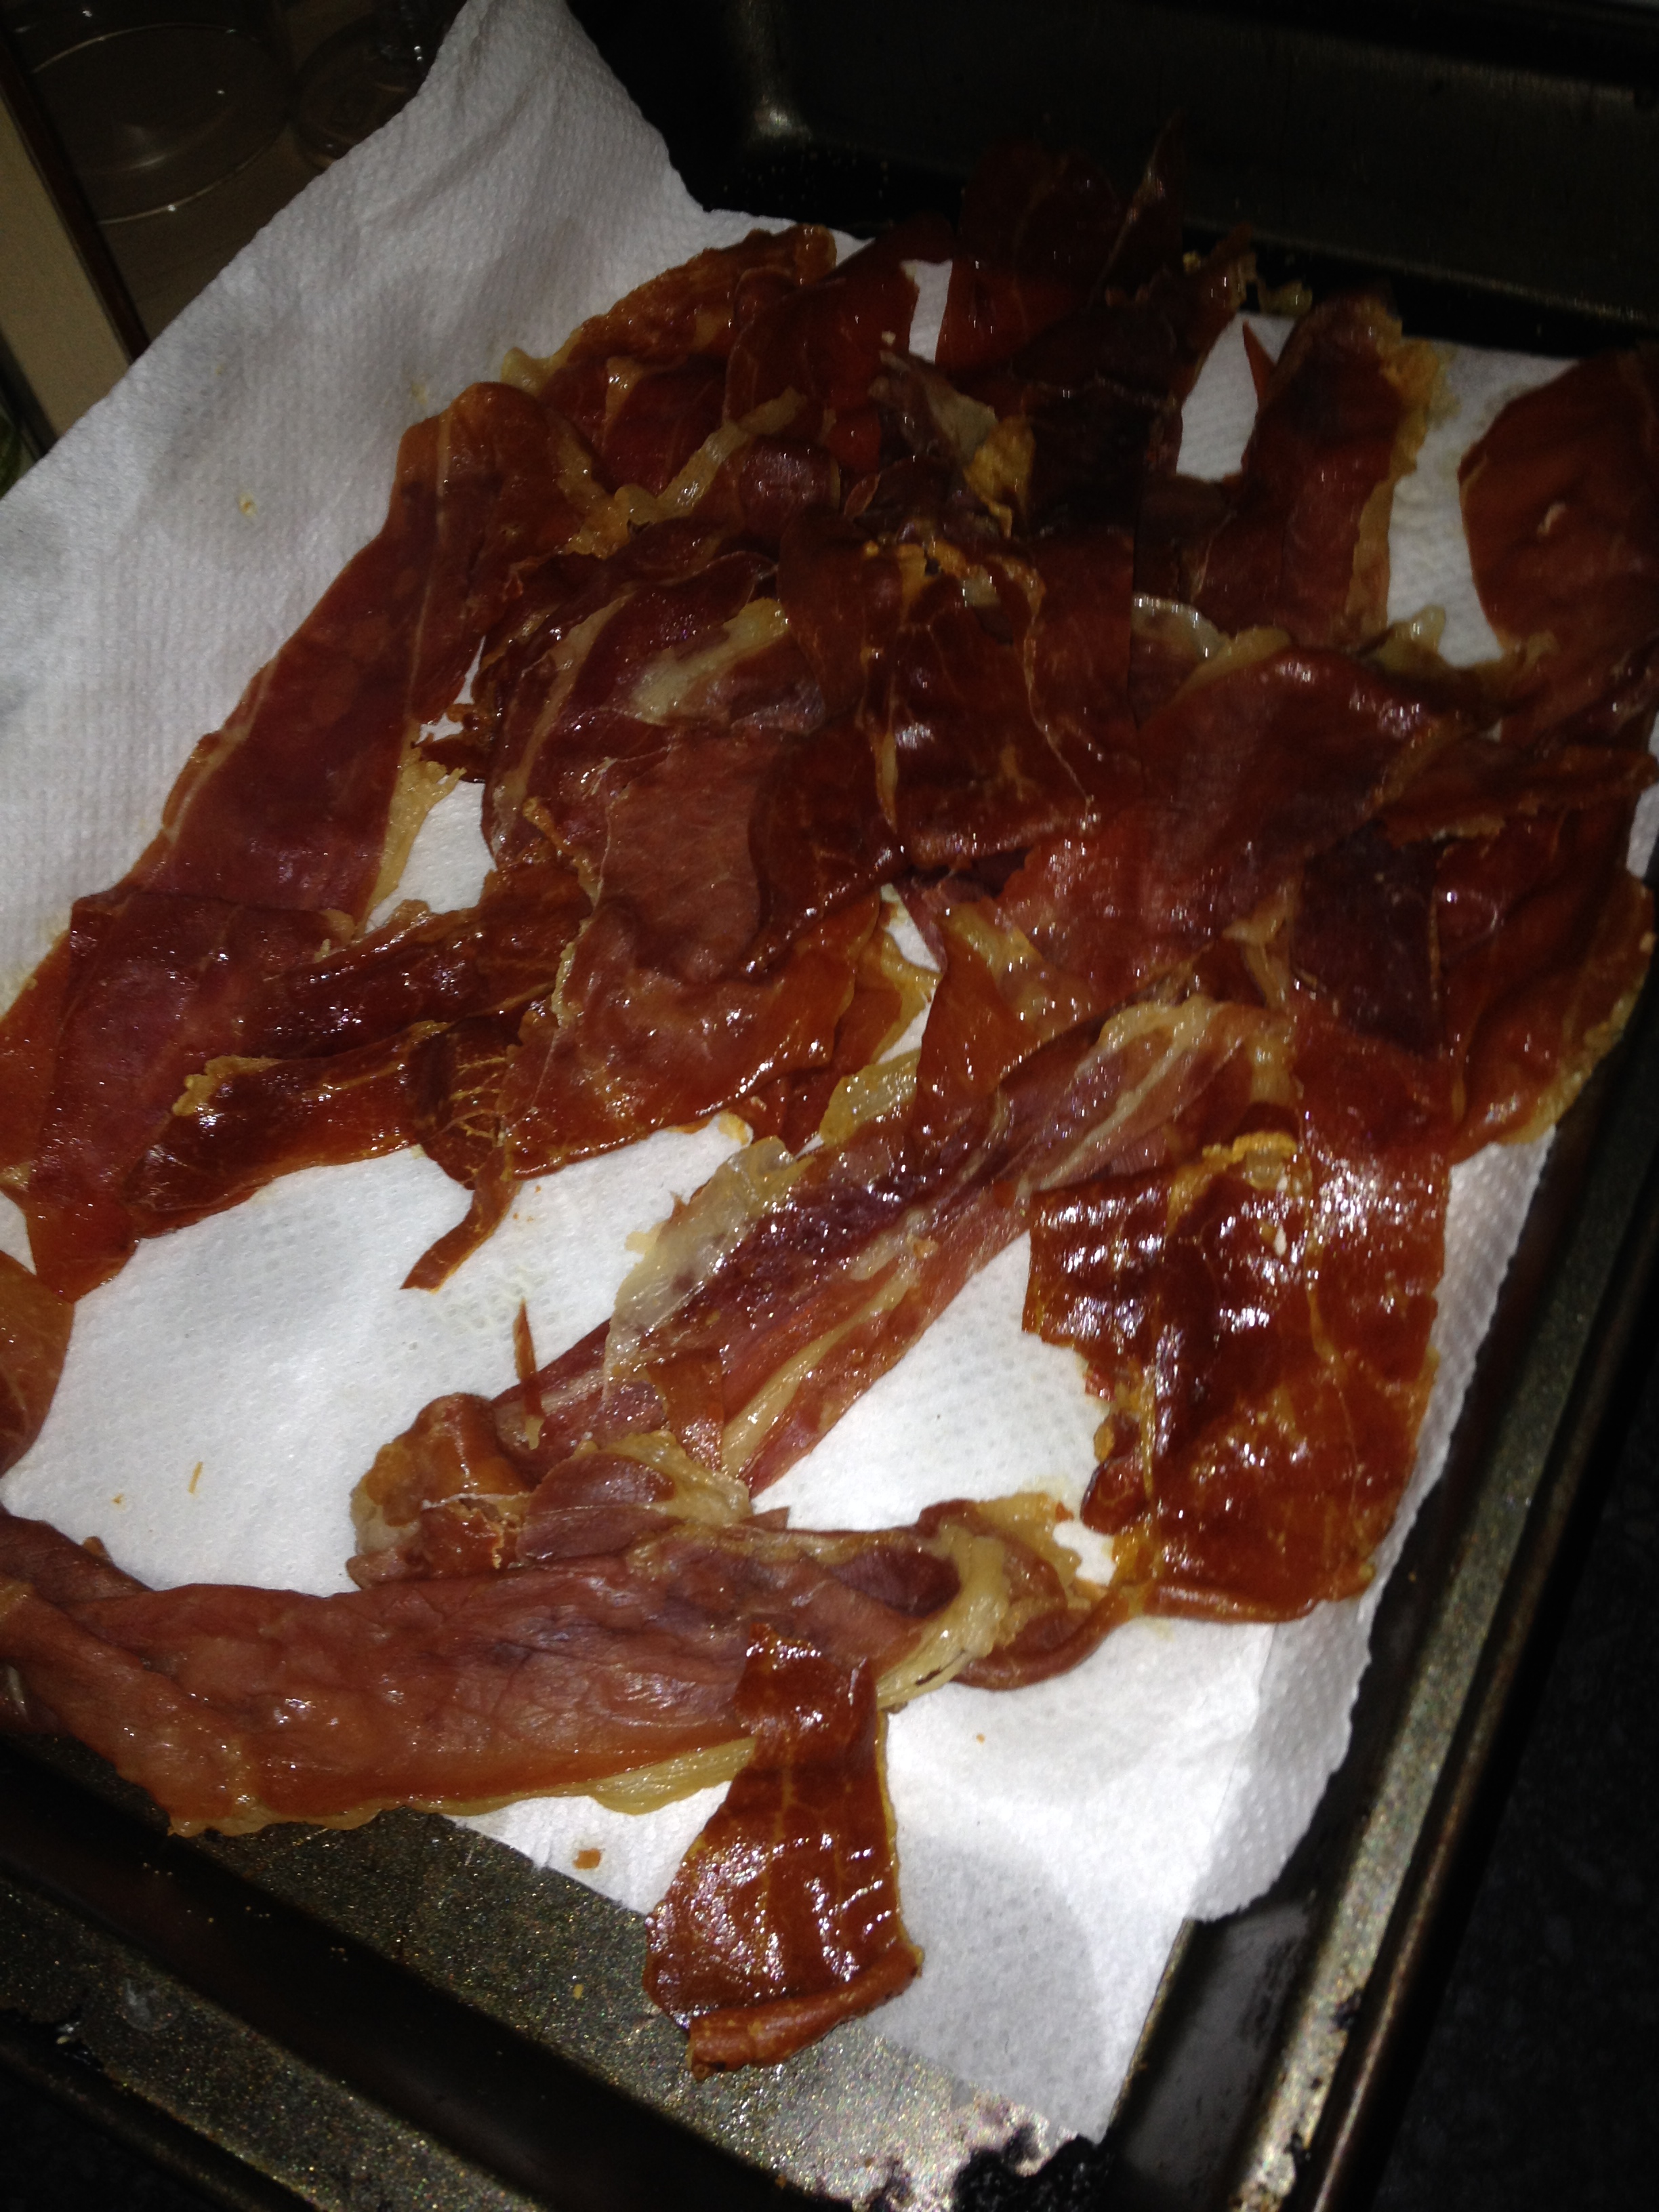
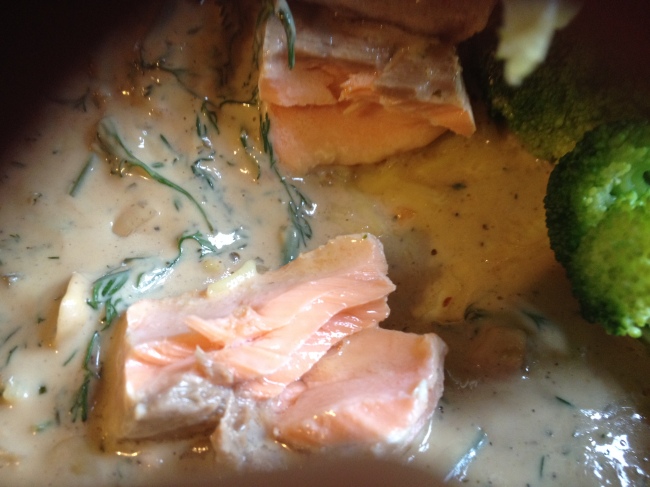
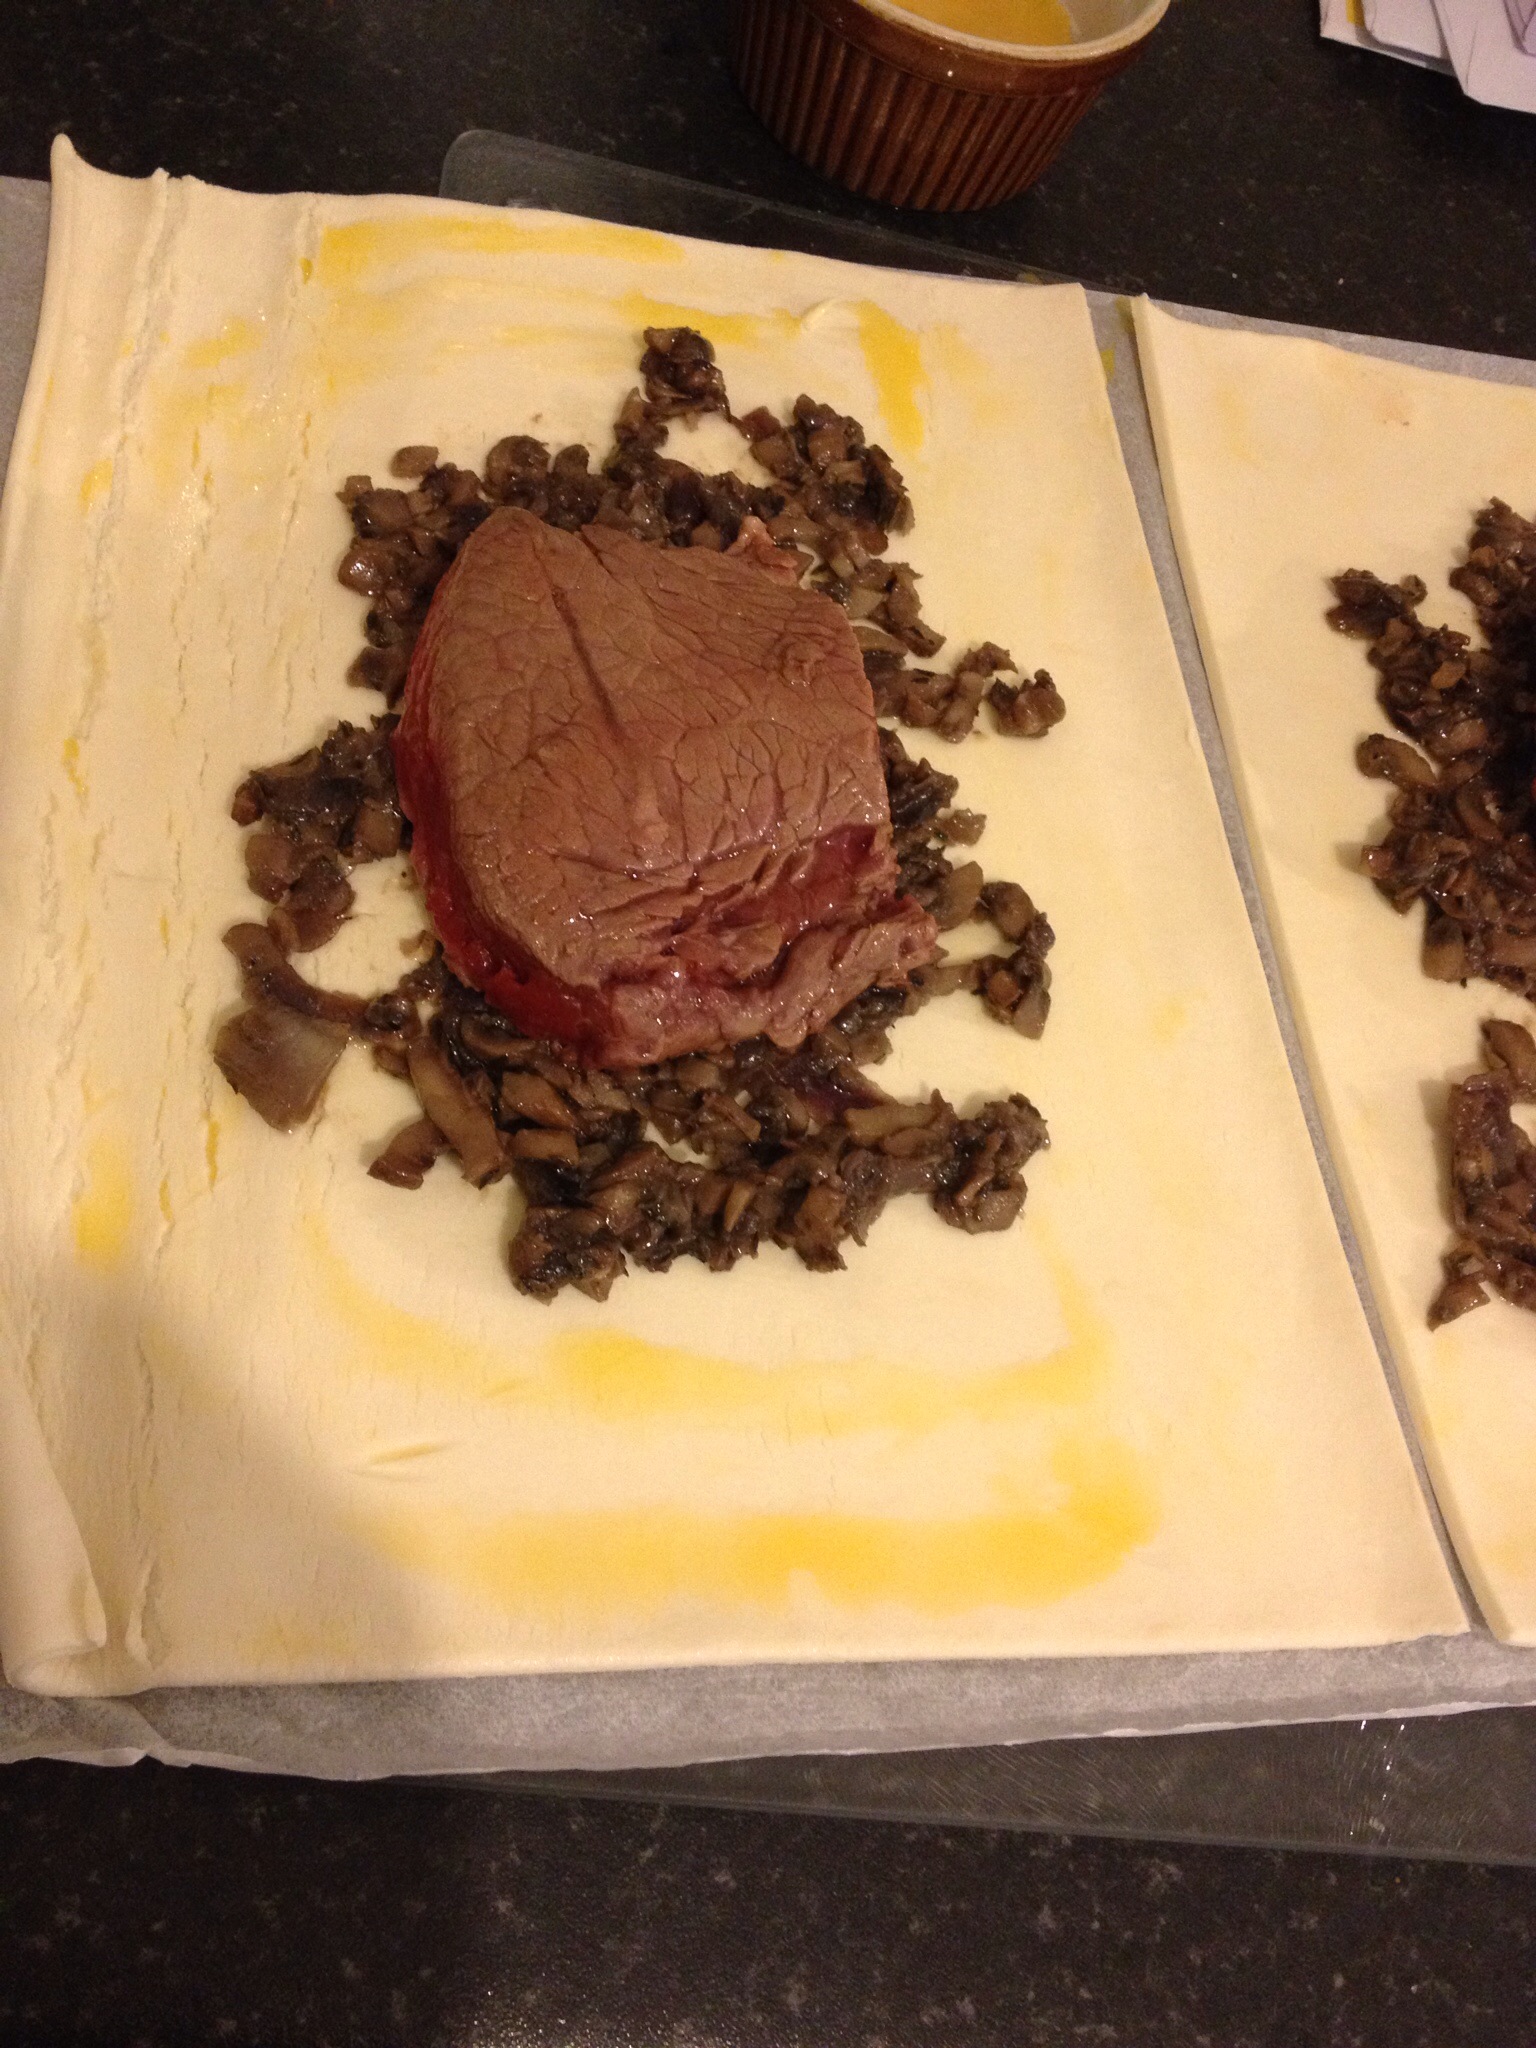
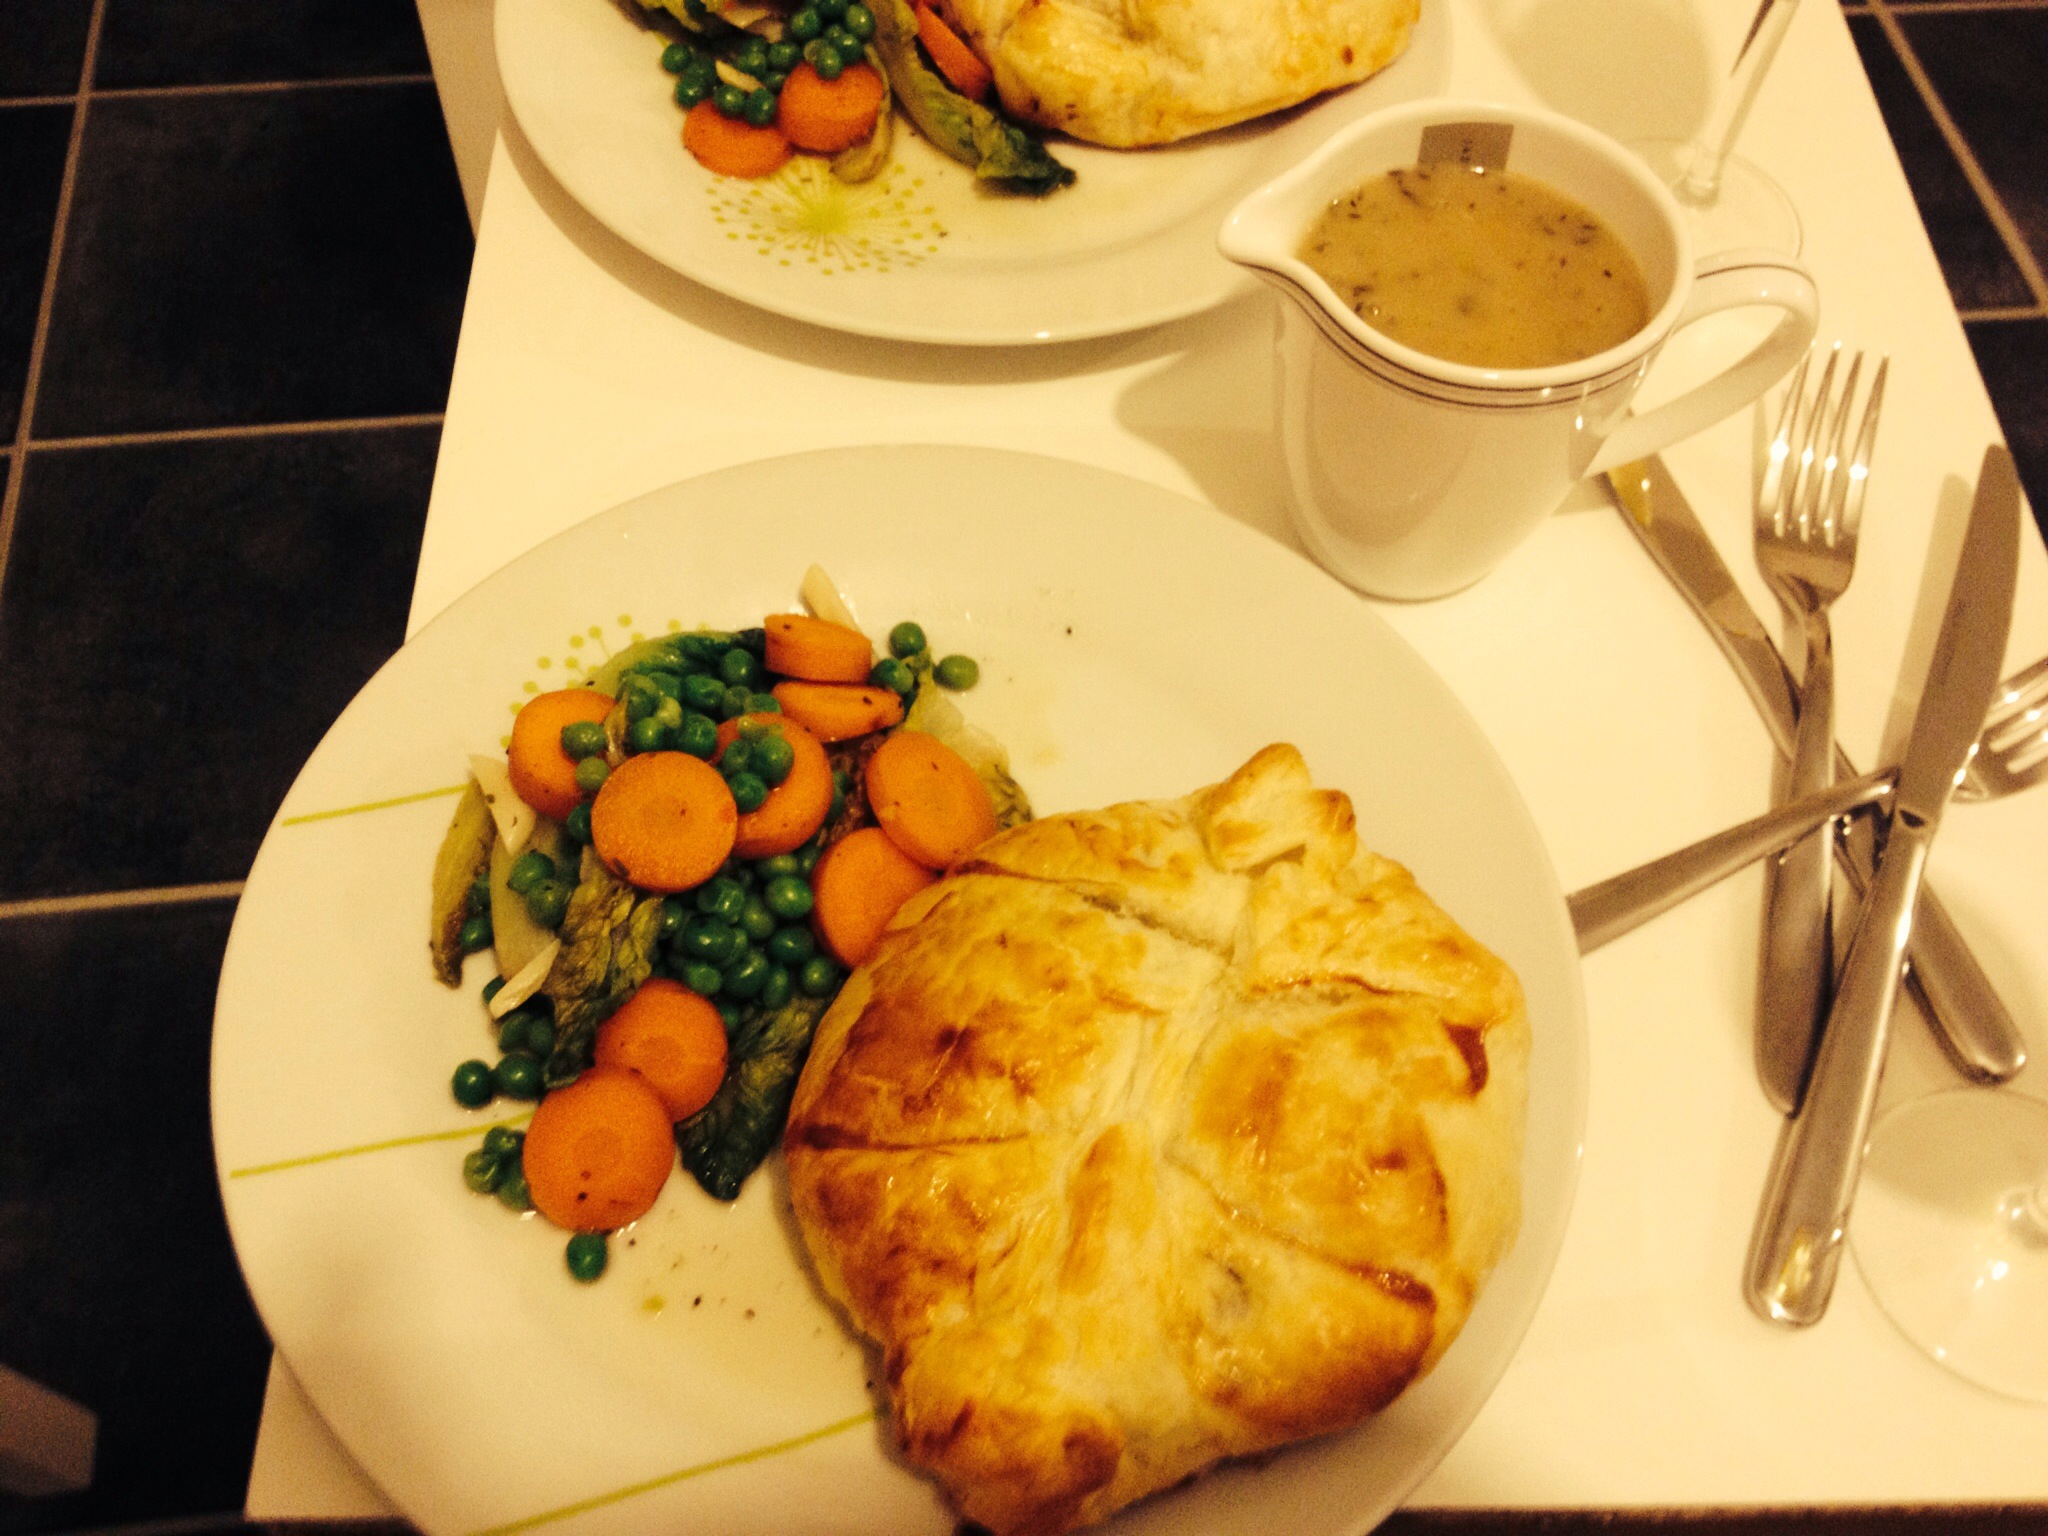
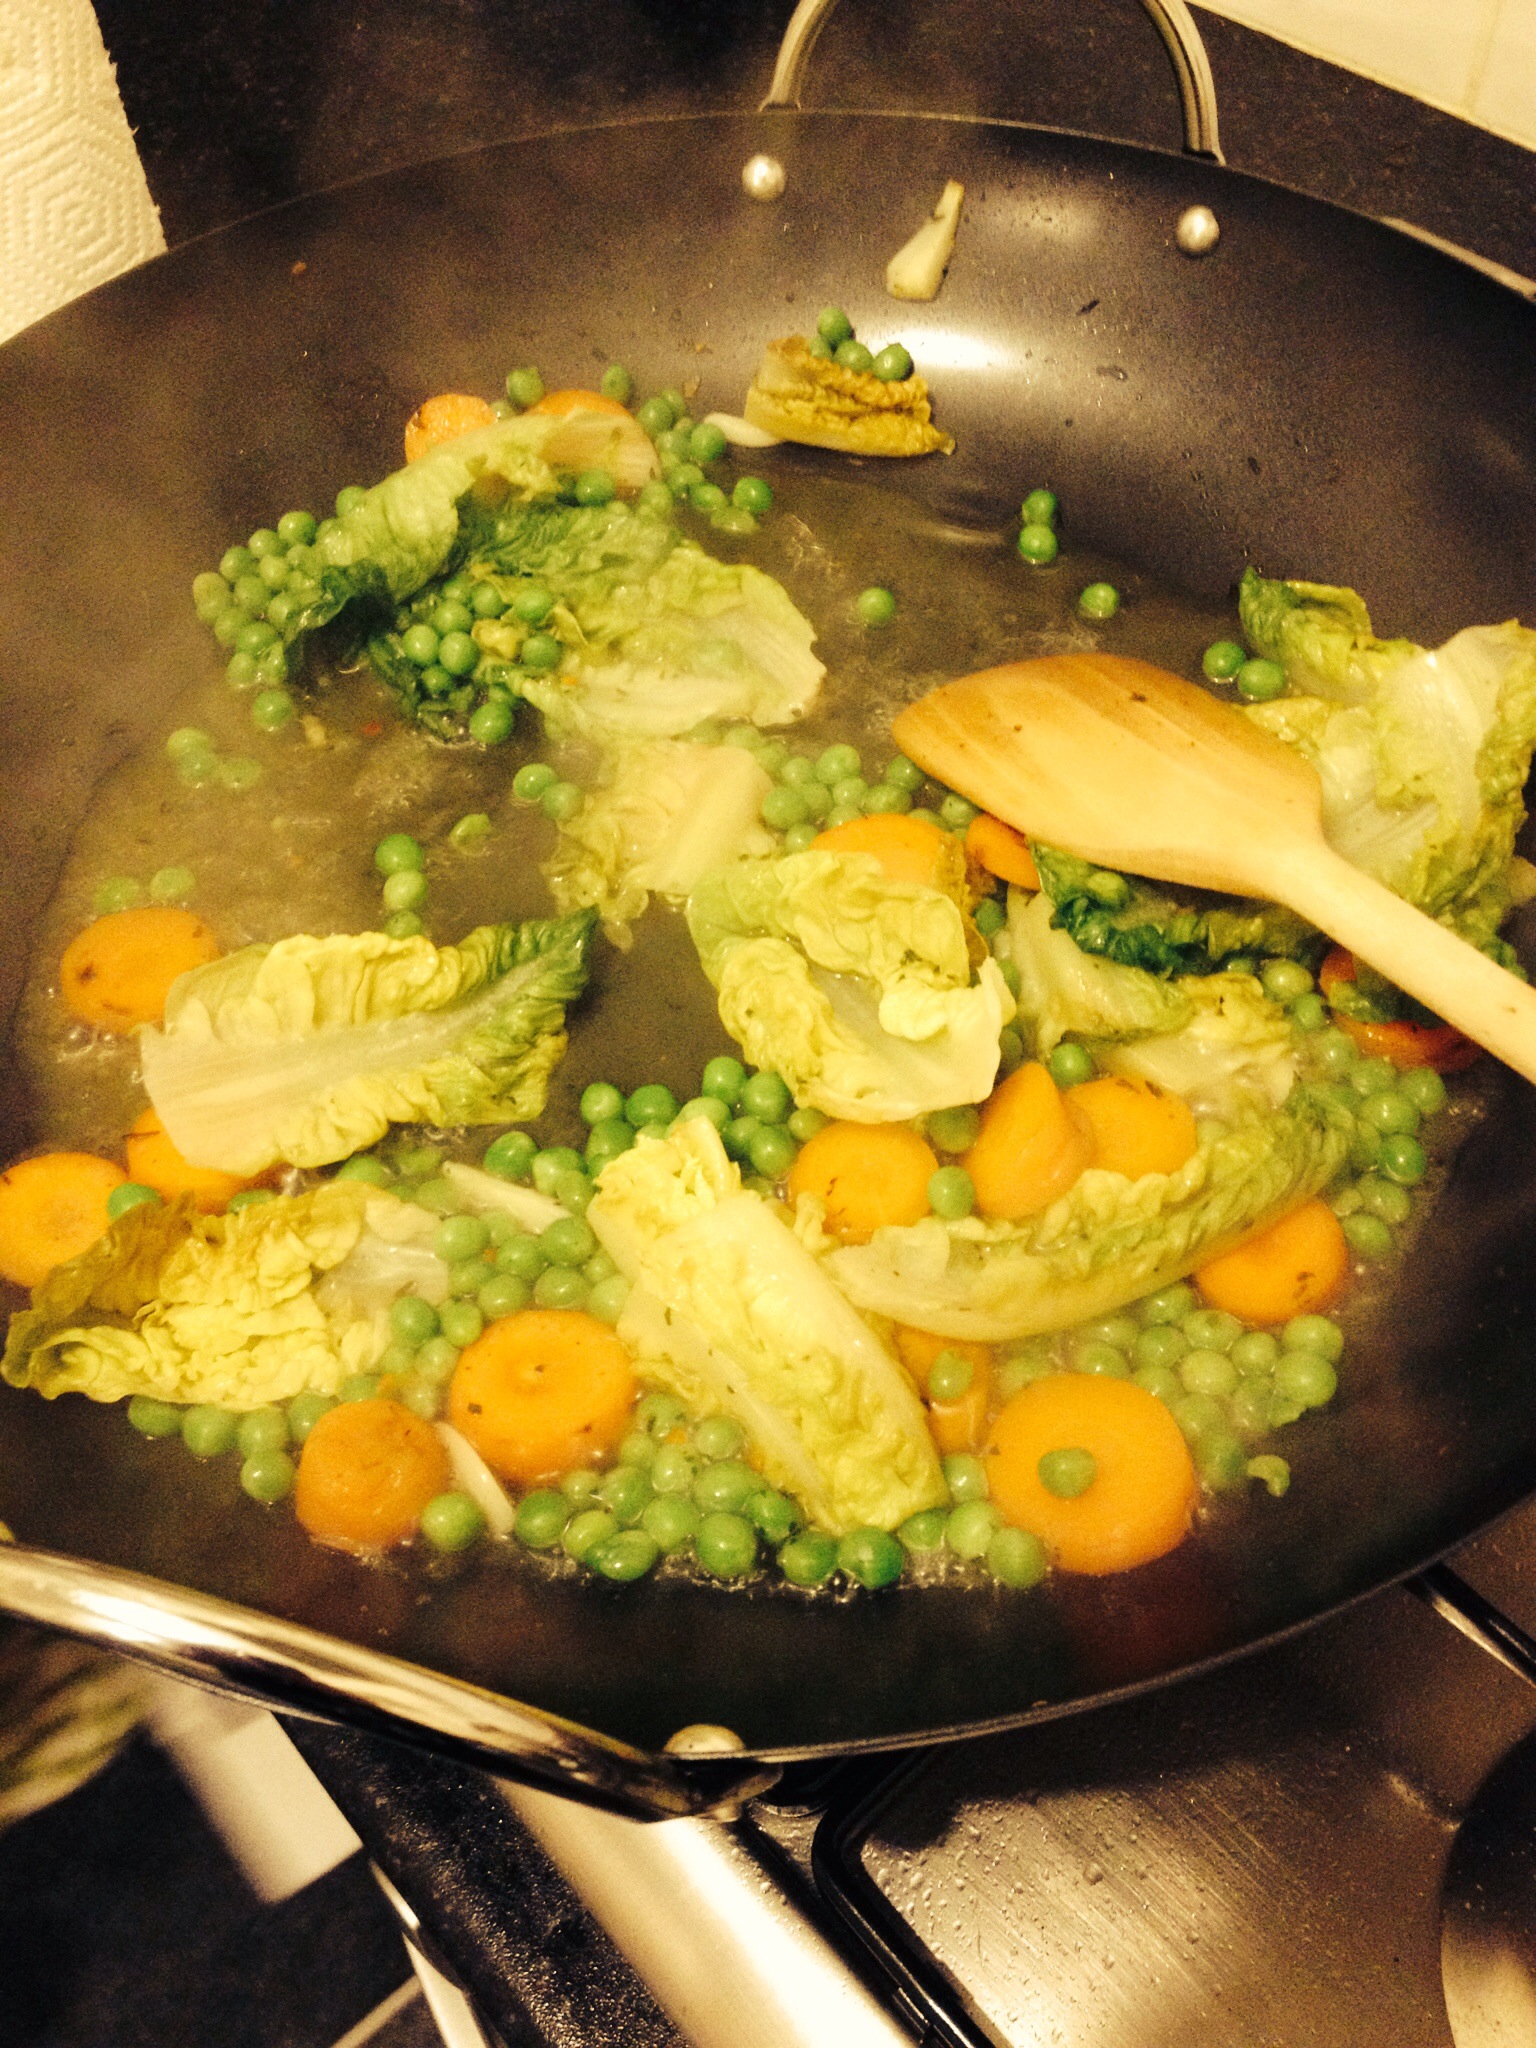
Now I’ve given you a moment to get over that terrible fact, I decided to make it for the main course of this dinner alongside braised carrots, baby gem lettuce and peas. There are many different ideas about the ideal beef Wellington, whether you add a layer of Parma ham, foie gras or pancakes. But owing to budget and craving for simplicity I stuck to a simple layer of mushroom duxelles. Besides, I believe adding anything that might mean more moisture around the meat will result in a soggy bottom for the pastry. Then of course there’s the pastry itself, again I went for the classic puff (shop bought, there’s no point in making your own except to learn how to do it). However I was recently informed that brioche pastry is even better so I will be trying that in the future. Finally there’s the meat, this I was very insistent should be rump. Aldi turned up trumps, 1 rump steak, easily enough to feed two people for under £5, sorted. Unfortunately I have waste not, want not attitude so used all the pastry resulting in a disastrously skewered pastry to meat ratio and the pastry was a little undercooked on the bottom (I decided to sacrifice this rather than a perfectly medium rare steak when push came to shove). However I was told that it tasted pretty good nonetheless so the recipe is below, just try to hold back on the pastry.

Individual Beef Wellingtons with braised lettuce
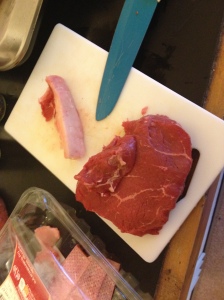
1 large rump steak, trimmed of fat and divided into two pieces
1 packet of ready rolled puff pastry
1 egg, beaten
300g mixed mushrooms, finely chopped
Fresh thyme
2tbsp brandy
Splash of truffle oil
1 bay leaf
Olive oil
Salt, pepper
3-4 garlic cloves
1/2 red onion, finely chopped

For the sauce
2tbsp flour
300ml stock
2-3 cloves garlic, chopped
1tbsp brandy
Fresh thyme, chopped

For the braised lettuce
1 baby gem lettuce, broken into leaves
Peas
Carrots, chopped into discs
2 cloves garlic, finely chopped
100ml stock (but 1 stock cube)
1tbsp butter
1/2tsp dried mint

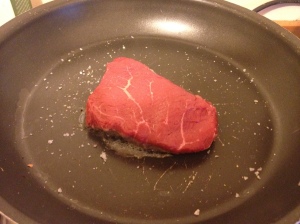
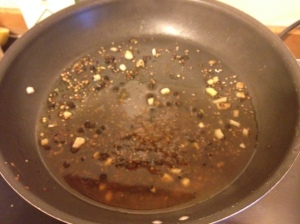
1. Sear the meat over a high heat (try not to set the fire alarm off) for about 1 min each side, set aside to rest in the fridge. Add brandy and garlic for the sauce to this pan immediately then turn off the heat, this will be used later. Nb it will bubble furiously but should die down, put into a cold oven to keep the smoke out of the kitchen.
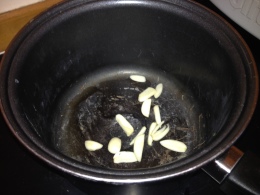
2. Meanwhile put the mushrooms, garlic, thyme, pepper, bay leaf and onion into a saucepan with a drizzle of olive oil and a hefty pinch of salt. When hot, add brandy to the pan and allow to bubble furiously before turning down the heat, cook until most of the moisture has been drawn out of the mushrooms, add truffle oil at the end of cooking. Set aside in the fridge to cool down.
3. It is important at this point to make sure both the meat and the mushroom mix is cold, or the pastry will melt, ideally your kitchen should be cool as well so maybe make the first two steps earlier in the day. Take out the pastry and brush with a layer of beaten egg. Apply a layer of the mushroom mix leaving a circle around the edge. Place the meat on top and wrap the pastry around, sealing the edges by pinching the pastry together and moulding to the meat, try as hard as you can not to have any gaps at all. Repeat with the second one.

IMG_0196.JPG

IMG_0182.JPG

4. Brush with more beaten egg and refrigerate for 10mins.

.

IMG_0141-0.JPG

Preheat the oven to 200oC and bake for 25mins. Turn the heat down to 180oC and cook for a further 10mins till the pastry is golden.

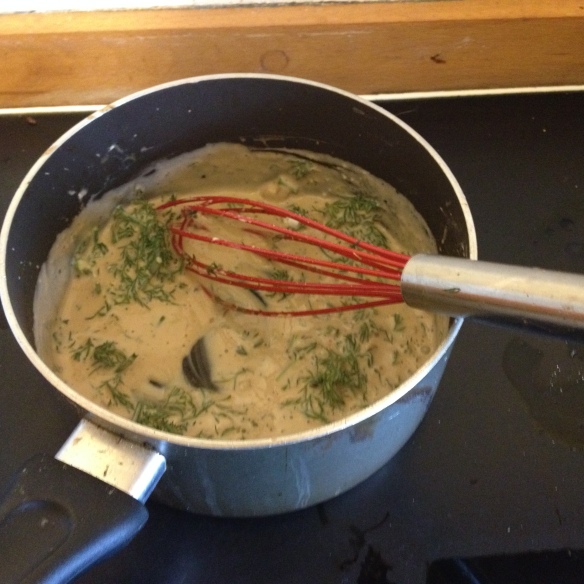
5. Meanwhile add the flour to the saucepan with brandy in it from step 1, whisk furiously over a low heat to form a paste, gradually add the stock to the pan, whisking as you go to form a thin liquid, add the thyme and season to taste.
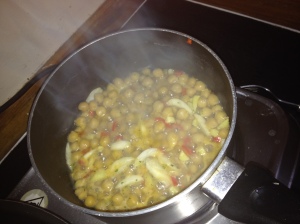
6. For the braised lettuce, Cook the carrots for 3-4mins with the stock, garlic, mint and butter. Add the peas, cook for a further 2mins, and finally the lettuce, cook for another 2mins.
7. Serve

IMG_0157-0.JPG

IMG_0324-0.JPG

For dessert I reached another blockage, I discovered at this point in the meal that I was missing a crucial attachment for the magimix, so had to make the magic ice cream below in the kitchen aid and somehow it didn’t work, but prior experience means I know this recipe will most definitely work if you have the right equipment. This also means I didn’t take a picture.

Banana Ice Cream, salted caramel rum sauce, dark chocolate, coconut shortbread

For the Shortbread
60g room temperature coconut oil
80g flour
Vanilla extract
Pinch of salt
25g sugar

For the rest
2 bananas
200g caster sugar
2tbsp rum
50g butter
Vanilla extract
Large pinch of salt
2 squares of 85% dark chocolate

1. Mix the flour, vanilla, salt, sugar and coconut oil together to form a dough. Roll into a thick oblong shape and refrigerate for 30mins or more. Slice the oblong and lay on a baking sheet. Bake in a preheated oven at 180oC for 10-15mins until golden brown, leave to harden on the tray.
2. Freeze the bananas, peeled and sliced. Just before serving, remove from the freezer and whizz up in a magimix for your own soft serve ice cream.
3. For the sauce, leave the butter, salt and sugar with 2tbsp water over a medium heat, do not stir but you may swirl. When just beginning to turn golden (nb this must be watched or it will be a hard gooey mess -toffee) take off the heat and add the rum and vanilla extract, stir as it bubbles furiously.
4. Serve the ice cream, topped with the sauce and a square of dark chocolate with the shortbread on the side.

Pillows of Heaven: Macaroons

photo 3-5

You may or may not have noticed that I am a little bit obsessed with macaroons. The macaroon tour of Paris may have given you a hint. While in Berlin recently I detoured into the nearest Galerie Lafayette to the Macaroon counter to taste the ‘Brazil’ macaroon (Curacao, lime and mint).  My next challenge will be savoury macaroons, watch this space.

This could be the reason why I’ve shied away from making macaroons, I always worry that I would fail to live up to my expectation. But given the time on my hands (and the excuse of family friends coming over for a drink in the 24hours my parents are here), plus it would be an excuse to use the pretty cake stand, I’ve bitten the bullet. The greatest compliment I got was ‘I thought they were from Maison Blanc, take that Raymond.

The most important things seem to be:

a) The consistency, how long you mix, exact measurements etc

b) Not adding anything that will change the ratios e.g NO extra liquid

c) Baking for the correct length of time


Makes a lot (I split into two different flavoured batches)

4 large egg whites

70g caster sugar

230g icing sugar

120g ground almonds

pinch of salt

gel food colouring (or paste – DO NOT USE LIQUID)

1. Beat the egg whites to stiff peaks, I found using a kitchen aid mixer the easiest. You should be able to turn them upside down on your head without them falling out. Beat in the sugar to shiny thick peaks, then beat for 2-3mins more. They should be really really stiff. Add the gel food colouring and beat for 40sec more.

IMG_2097

IMG_2107

2. Sift the ground almonds, icing sugar and salt into the bowl and fold into the mix with a spatula gently. This should take 30-50 folds, actually count. Too little and the macaroons will be to meringue like and crumble, too much and they will be too dense, I took about 40 folds. The mixture should be thick and shiny but still light and not liquid.

IMG_2098

3. Put into a piping bag (see Baking tips) and pipe small blobs onto a lined baking tray. They should be about the size of a 2p coin. The best way to do this is slowly and gently and pull the piping bag to the side of the macaroon to try and avoid a peak. Drop the macaroon tray from a small height onto the kitchen worktop to get rid of any bubbles, and prevent cracking.

IMG_2104

IMG_2099

IMG_2108

4. Leave for 20mins to develop a skin on top (make sure the kitchen isn’t too warm). Bake in a preheated oven for 20mins at 150oC, turning halfway through to ensure an even bake. They should easily come off the tray, if not they need to be baked more.

IMG_2105

IMG_2106

IMG_2109

5. If you can wait that long, the shells work even better if left in an airtight box overnight.

Flavourings and Fillings

photo 3-6

– This time round I made Raspberry, Popping candy and White Chocolate and Pistachio and Dark Chocolate, but you can experiment with buttercream fillings, jam fillings, cream fillings or other nuts in the shell.

– Mostly it is best to leave the shells flavourless and just add colour, leaving the flavour in the filling. However you can flavour with other nuts, or citrus zest or intense powder flavours, as long as you don’t alter the ingredient ratios too much.

– For Pistachio macaroons replace half the ground almonds with finely ground pistachios (I just ground them myself in a food processor).

Chocolate and Pistachio Ganache

Pistachio Paste

60g pistachios (weight without shells)

15g ground almonds

30g granulated sugar

1tbsp water

2tbsp sunflower oil (I experimented and added a drop of truffle oil as well)

pinch of salt

Chocolate Ganache

150g dark chocolate

75g cream (or half cream, half alcohol)

30g butter

vanilla extract, pinch of salt

1. Toast the pistachios at 200oC for 8mins. Meanwhile heat the sugar and water to about 120oC then toss in the pistachios, coat and leave to cool.

2. Place in a food processor with the almonds and salt. Grind to a fine powder, add the oil so the mixture forms a paste.

3. Heat the cream, vanilla and salt to boil. Meanwhile chop the chocolate finely. Pour over the cream as soon as it reaches the boil. Leave for 1min then stir till chocolate is completely melted. Stir in the butter till melted.

4. Combine the paste and the ganache, put into a piping bag and refrigerate till needed. Bring to room temperature before piping.

IMG_2100

photo 1-6

photo 2-7

White Chocolate and Raspberry Ganache

150g white chocolate

75g cream

2-3 drops raspberry extract

vanilla extract

pieces of freeze dried raspberries

popping candy

IMG_2101

1. Heat cream, raspberry extract and vanilla to boiling. Finely chop the white chocolate. Pour over the cream as soon as it reaches boiling point and stir till chocolate is completely melted. Fold through the raspberries and put in a piping bag.

IMG_2102

IMG_2103

2. After piping into macaroons, sprinkle with a little popping candy before putting shell lid on top.


photo 4-4

photo 1-5

Continental Breakfast

My parents have always been obsessed with croissants, so much so that when my father couldn’t work out where the cereal was kept on his house and left alone for breakfast, there was no question of sending his secretary out to the corner shop to buy him none other than a croissant. What’s not to love? A buttery, flaky pastry that melts in the mouth, a crisp exterior best served warm with lashings of jam. Even the famous ‘French Women Don’t Get Fat Diet’ recommends a small croissant for breakfast as the only way to start the day. Marie-Antoinette is said to have brought these delicate pastries over from Vienna to Paris. Virtually the only thing she would eat, they are even said to have inspired the notorious ‘Let them eat cake’ quotation. Definitely not an everyday bake, rather time consuming, they are nonetheless exceptionally satisfying to make, and make the house smell amazing, making my parents’ only 24 hours in the house in my 2 weeks at home, special.

Makes 13 small croissants

250g plain flour

70g water

70g whole milk

25g sugar

20g unsalted butter

7g yeast

large pinch salt

drop vanilla essence

To Laminate

140g cold butter

1 egg, beaten to wash


1. Mix all the ingredients together ( I used a dough hook on my kitchen aid). When combined knead for 3mins so there is moderate gluten development, too much will cause too much fight back from the dough while ‘laminating’ (adding the butter). The best way to tell is when the dough has turned shiny and doesn’t leave any traces on the side of the bowl. Shape the dough like a disc (so it can be easily shaped into a square later) and leave in the fridge overnight.

2. To Laminate, start by slicing the butter and filling a 7.5cm square on a larger piece of baking parchment. Place another baking parchment piece on top and roll out to 9.5cm square. Trim the uneven edges to 8.5cm square and place the trimmings on top, gently even out the thickness. Then refrigerate. To get an even thickness, roll from the middle to each side, rotating

IMG_2095

3. Take out the dough. Roll out to 20x30cm rectangle using the same method as above. BUT this time sprinkle both pieces of paper with flour. Take your butter out of the fridge and place in the centre so that a corner is facing an edge. fold each corner of the dough into the centre like an envelope. Roll out using the method above to a 20x30cm square. Fold the edges in like an envelope again and refrigerate for 30mins. Repeat this process 4 times. On the last time roll the dough out to 20x70cm, dust with flour, carefully fold and refrigerate overnight. Alternatively you can leave in the freezer for a couple of hours then the fridge for another couple of hours.

IMG_2096

4. Take the dough out and trim any curved edges. Using a pizza cutter/knife and a tape measure, mark 10cm intervals along the top. Mark 5cm along the bottom then continue in 10cm intervals. Using a ruler, cut diagonally towards the firs 5cm notch from the top left corner and then diagonally up to the first 10cm notch on the top, this will form a triangle. Continue. You should have 13 triangles and a few extra pieces for make into pain au chocolate’s (by filling with a square of good quality dark chocolate) or just odd shaped croissants.

5. Take a triangle, make a cut in the middle of the bottom and roll up to the point. Continue with the remaining triangles. Place on a lined baking sheet and brush with egg wash. Leave for 2 hours at room temperature to prove. .

6. Bake at 180oC fan for 6mins. Then turn the oven down to 150oC and bake for a further 8-9mins. They can be reheated, not as good as freshly baked, but almost.

IMG_2110 IMG_2111

A Night at the Opera

Next on tour of French Patisserie is a classic combination of coffee, chocolate and cream (the French Tiramisu) and a homage to my other passion, the Opera cake. This cake is technically difficult but melts in the mouth, when made correctly, and is almost as tasty as Tenor Jonas Kauffmann (Exhibit A https://www.youtube.com/watch?v=RzLR1OuDaKY&list=PL4_Y5duTlUpkLbLPRZ16uNo1Xxo_Fcr8Z). It was made famous in the 19th century by French Patissierie Dalloyau, which just so happens to be in the shadow of the Opera Garnier the building on which the pastry is based on. I assume that the many decadent layers of the cake are meant to mirror the decadent layers of the Opera Garnier. I should hopefully end up with perfect contrasting cream and brown layers with a smooth, shiny chocolate ganache on top.

Garnier Opera 5operacake

The First Challenge is the Almond sponge, I found the key here was to be very gentle with the mix, especially folding the egg whites, be very accurate with the measurements and trust your oven (i.e don’t open the door too early during cooking or the cake will sink). I also made this sponge mix in two batches (I only had one tin and didn’t want the mixture to deflate too much between cooking, of course if you happen to have 4 swiss roll tins lying around handy, you’re fine.)

Almond Sponge (serves 10)

150g icing sugar

5 tbsp flour

pinch of salt

140g ground almonds

1tsp vanilla extract

6 eggs

30g butter, melted and cooled

6 egg whites

2tbsp caster sugar

1. Mix the icing sugar, flour, salt and almonds together. Whisk in the eggs one at a time slowly before adding the vanilla. Then add the butter.

2. Whisk the egg whites to soft peaks, (you should be able to turn the bowl upside down on your head without the eggs falling out – I greatly enjoy doing this to other people). Add the sugar carefully and whisk to shiny peaks. Mix 1/3 into the almond mix, whisking together. Fold (using a metal spoon in a folding action) the remainder of the egg whites into the mix.

3. Spread a thin layer onto a lined swiss roll tin (34.5x 24.4cm). Make sure to use a palate knife to spread the mix to the ages, but try not to overwork it or it will lose the rise. Bake at 220oC for 6-8mins, until golden brown. Turn out onto a wire rack to cool. Repeat 4 times.

IMG_2066

For the Coffee Syrup

300ml water

150g sugar

3tsp expresso powder (I also like to add a drop of vanilla extract)

1. Stir the ingredients together until dissolved over a low heat, bring to the boil, boil for 1-2mins, remove from the heat.

IMG_2074

For the Coffee Buttercream

4 egg yolks

150g sugar

40ml water

pinch of salt

300g butter

2tsp expresso powder dissolved into 2 tsp boiling water

1. For this recipe you really need a kitchen aid (no-hand mixer) or a hand held electric whisk (but you may need help). It’s quite hard to do it without… Whisk the 4 egg yolks on high for 5mins until light and creamy.

IMG_20692. Meanwhile heat the sugar, water and salt in a pan until boiling. Boil until you get a clear syrupy consistency (roughly 115oC).

3. Immediately pour into the egg yolks little by little, like making mayonnaise, while the mix is still mixing. Add a bit then whisk some more and repeat. You should end up with a lighter pale mousse consistency. Keep whisking until cooled to room temperature (feel the sides of the bowl, if it is too warm the butter will melt into the mix and you won’t get the desired consistency.)

IMG_2070

4. Add the butter bit by bit and whisk until you get a white creamy mix. Add the expresso, cooled.

IMG_2071        IMG_2073

For the Ganache

100g dark chocolate 

15ml cream

60ml whole milk

(optional: 20ml white rum)

50g butter

1. Chop the dark chocolate finely and pour into a bowl. Heat the cream, (rum) and milk together and bring to the boil. Immediately pour over the chocolate and leave for 2-3mins. The chocolate should have melted. Mix to a smooth melted chocolate consistency if need be add more dark chocolate to achieve desired consistency and blast for 5-10secs in the microwave at a time to heat a little, before beating to melt. When chocolate is melted add the butter and mix till melted. Leave to cool to a spreadable consistency.

IMG_2077

For the Chocolate Glaze

200g dark chocolate

60g butter

1. Melt chocolate and butter together. Reserve some in a piping bag to pipe.

To Construct

1. Take 1 of the sponges. Lay down with the non-parchment side facing up. Temper 150g chocolate. (Melt at 20 sec intervals until almost all is melted – there should be a few lumps, take out and stir till all the lumps have melted = easy tempered chocolate). Spread this over the sponge in a thin layer, then leave to set in the fridge for 5mins (you don’t want it completely hard). Flip onto a cake board/whatever you want to serve the cake off. The chocolate bottom will make it easier to take the slices off the board later.

IMG_2075      IMG_2067IMG_2068

2. Soak the first sponge with coffee syrup, the more the better, but make sure to dab not pour the syrup over or you will just end up with a disintegrated sponge. Apply your first layer of buttercream, using a palate knife to smooth it down to about 1/2 cm thick.

IMG_2076

3. Top with the next sponge, parchment paper up. Remove the parchment paper and soak with coffee syrup. (NB you may want to refrigerate the cake between layers if your kitchen is very hot. But the buttercream will have to sit out a little so it can be spread.

4. Spread with chocolate ganache, then top with the next sponge and soak with syrup. Spread with more buttercream, top with the final sponge and soak with syrup.

5. Finally spread one more layer of buttercream, thinner than the others. This is mostly just to make the top smooth and fill in the cracks.

6. Finally pour over the glaze, spread evenly and quickly (mine wasn’t as even as I would’ve liked and the key is speed.)

IMG_2079

7. Let set for a little, then take a serrated knife and cut down each side to trim the edges. Keep refrigerated till served.

IMG_2085IMG_2084

London Calling

It was long ago decided my sister was going to be the rich sister, along the same time as she decided to go into Property and about the time I decided to go into food…. Unfortunately I can’t even claim to be the creative one in the family as she is both musical as well and way more fashionable than I am. What I can do however is cook for her friends when I am up. While my sister is not actually a bad cook, the fact that she was surprised that the list of ingredients included olive oil (which she didn’t have in the house) was possibly a good reason for me to intervene when cooking 3 courses for 8… London is still a little bit of a novelty for me. Having grown up in Oxford and barely ever leaving University in Cambridge during term time it’s still slightly exciting to use the tube, shop in Oxford street and go out in London (although the prices soon wear the novelty down). I was down in London to do a course in Wine course, 48 wines in 3 days (although of course you spit most of them away as you have to be pretty on it for the exam at the end of the 3 days). So now I should be able to tell you quite a lot about all the different grapes, where they come from, what they taste like and matching wines to food. (More on that later)

IMG_2046

So for the menu I cooked for my sister (aided I might add at this point by my sister’s lovely friend the business whizz, who came early to help. About 2 mins after I first met her she was chopping onions, absolutely brilliant) I made:


IMG_2052 IMG_2053  IMG_2054

Crunchy Butterbeans

1. Spread out 800g tinned Butterbeans or Garbanzo beans in an ovenproof dish. Sprinkle over sea salt, pepper, lime juice, paprika, pinch of cinnamon, pinch of cayenne pepper and a drizzle of oil.

2. Roast in the oven 190oC for 30mins, then turn down to 160oC and roast until crunchy, checking every 10mins to stir.

IMG_2051

White Gazpacho

1. Lay out 100g flaked almonds on a baking tray lined with foil. Toast at 200oC for 8-10mins until browned. Roast 2 heads of garlic at 200oC for30-40mins and then set aside to cool. Slice 100g white grapes in half and freeze with 100g quartered slices of cucumber.

2. Cut 375g white grapes in half and place in a bowl with 375g of chopped, skinless and seedless cucumber. Pour over 360ml natural yoghurt, a pinch of salt and pepper, 360ml water, 300g ground almonds, 360g sourdough bread, crust removed and torn into pieces and the roasted garlic cloves. (The best way to do this is using a serrated knife and slice of the bottom of the head of garlic and squeeze out the insides) Mix and leave overnight to marinade.

3. Blend the fridge mix together and season with salt, pepper and sherry vinegar to taste. Serve garnished with frozen grapes, frozen cucumber slices, flaked almonds and drizzle of oil.

Giant Couscous Paella, Roasted Cod, Crispy Ham, Pea Puree

1. Lay 140g Serrano ham (or Proscuitto) on a single layer on a lined baking tray nd roast for 6-8 mins at 200oC,, separate, cut into strips and leave to cool.

2. For the pea puree take 400g frozen peas, add 125ml vegetable stock, 3-4 garlic cloves, a bunch of mint, bunch of parsley and 2 tbsp Greek yoghurt. Blend together till smooth, season to taste. Refrigerate till ready to use.

3. For the Paella, soften 2-3 onions with 4-5 finely chopped garlic cloves and a pinch of salt in 2tsp olive oil. Add a splash of white wine, 4-5 strands of saffron, 1-2tsp paprika, 1-2tsp cayenne pepper and 2-3 red peppers cut into strips. Add 300g giant couscous and stir to coat for 2-3mins. Add 400ml stock and cook 8-10mins until the couscous is cooked.

4. For the cod, put 8 cod fillets skin up in a roasting tin, season and drizzle with olive oil. Roast in the oven at 200oC for 8mins until just translucent and the skin is beginning to crisp.

5. Place pea puree on the plate, put a circle of paella in the centre and top with the fish and crispy ham.

1. IMG_2050 IMG_2049

Lime Sponge, Lime, Tequila and Salted Caramel Syrup, Avocado mousse and White Chocolate Mint leaves

1. For the Syrup (1). Place 150g sugar in a pan. Add 50ml water, a large pinch of salt, 1 lime juice and zest. Bring to the boil and DO NOT STIR. Let bubble till it begins to turn very light orange, remove from the heat. Pour a little syrup into 8 greased, foil mini pudding basins. Leave to cool.

2. For the Sponge. Beat 170g sugar and 170g butter together until light and fluffy. Beat in 2 eggs, vanilla essence, zest of 1 lime and 1tsp cinnamon for 2-3 mins. Fold in 170g self raising flour. The mix should be pale yellow and not too thick, if it is too thick add a little milk. Spoon batter into the 8 pudding basins, filling up to halfway. Bake in the oven for 12-15mins at 140oC or until golden brown and cooked in the middle (check using a metal skewer, if it comes out clean the cakes are done. Set aside till ready to use.

3. For the Mint Leaves, Melt 100g white chocolate in a microwave in 20sec bursts. Pick individual mint leaves and pat completely dry. Dip the leaves in the mint and place on a greased, foil lined tray, place in the fridge to set.

4. For the mousse, mash 2 avocados and blend with 300g Greek Yoghurt (blending creates a lighter texture than just mixing). Add a small bunch of mint, a pinch of salt, 2-3tbsp of icing sugar and lime juice (to taste).

5. For the syrup (2). This syrup needs to be clear so make the syrup as step 1 but take it off the heat before it gets any colour and it should be thinner. Add 50ml white tequila. (This should be used warm)

6. To serve, turn out the sponges and drizzle with the warm syrup. Serve with the Avocado mousse and white chocolate mint leaf.


Tour de France

Since realising that I’ve finally left institutionalised education and actually have no fixed path anymore I’ve decided to branch out with my cooking. I seem to have had writers block during all the post exam furore ( hence the lack of posts recently) so I’ve decided to try and set myself challenges. In order to master these recipes I’ve always struggled with I’m going to read lots of different versions of the recipe to try and pinpoint the problems and come up with the best result. First up is Patisserie. I’ve never really mastered some of the classic French recipes so with a week of nothing to do but put off unpacking my university stuff, I decided to do a mini tour of the highlights of French patisserie. First up is choux pastry. In homage to the upcoming final leg of the Tour de France in Paris, I’ve decided to make  Paris Brest. This pastry was first made to commemorate the Paris-Brest bicycle race in 1910, ironically it was popular with the riders as it gave them a lot of energy but I can’t image that it would fit in with the intense nutritional programs of today’s competitors. It’s meant to look like a bicycle wheel, as exhibit A shows.

Paris Brest 4


I’ve had problems with choux pastry before. My profiteroles looked incredibly promising in the oven but sank the moment they came out leaving a soggy flat circle…. So this time I studied a number of different recipes to try and get it right this time. As far as I can tell the 3 things to be careful are

1. Don’t slack beating the flour and water mix before adding the eggs as the pastry needs a good support for the outer shell.

2. Don’t try to add all the eggs at once, the eggs need to be properly beaten so that the pastry rises enough.

3. Don’t take the pastries out of the oven too soon, even if it is a little brown, the pastries will sink if brought out too early.

The Recipe

1. Start by melting 150ml water and 50g butter and bring to the boil. Remove from the heat and beat in a pinch of salt and 75g flour into the mix so the dough is shiny and comes away from the pan. Return to the heat and beat for 2mins.

IMG_2059

2. Set aside to cool a little. When the mix is cool, add 2 eggs and a drop of vanilla essence, beating in 1 at a time. Beat well for 2-5mins until the mix is shiny and drops off the spoon.

3. Heat the oven to 200oC. Fill a piping bag with the mix and pipe circles onto a lined baking tray. (This is actually the hardest bit, try to make the thickness as equal as possible all the way round for a the prettiest finish) Brush the tops with egg yolk and then scatter over 50g flaked almonds. Bake in the oven for 10mins, then turn the heat down to 180oC and bake for a further 20mins until brown on top. As soon as they come out of the oven split the pastries in half lengthways. Leave to cool.

IMG_2061

4. For the filling, beat together 2 egg yolks and 40g sugar together until light and fluffy, then add 25g plain flour. Meanwhile heat 160ml whole milk in a pan with 1 tsp expresso powder and 1tsp vanilla extract. Pour the heated milk (not boiling) over the egg mix and whisk together. Return to the pan and cook over a low heat whisking constantly. When the mixture is thickened remove from the heat. Leave to cool (This is again where I went wrong – try to refrigerate this if possible as if you add the mixture too warm to the cream, the mix won’t be as thick in the pastries as it should be)

5. Beat 200ml cream to soft peaks. Fold in the patisserie cream and decant into a piping bag. Pipe between the pastry halves. Dust with icing sugar and serve.

IMG_2063 IMG_2062

As a side note I also had a go at making Kale chips (healthy crisps so I’m told). Simply remove the thick stalks of the kale leaves and tear into small pieces. Lay on a foil lined baking tray, sprinkle with salt and bake in the oven for 6-8mins at 200oC. It’s not quite the same as Walkers but they are pretty addictive.

IMG_2060

Goldilocks and the Three Bears? Peanut Butter Porridge

Goldilocks and the Three Bears?

So the day of the final exam looms, I am craving warm comfort food as I head into the final countdown. As a self confessed peanut butter lover, what better than a porridge that I can pretend is healthy. I like the fact that the peanut butter adds a richness and is subtly an aftertaste so the porridge isn’t too sweet, but feel free to add sugar if you like a sugar rush in the morning. Or if you are feeling really decadent add a spoonful of nutella as well. Oh and this is ridiculously simple, perfect while your trying to read your notes at the same time.

50g oats

300ml boiling water

1tsp cinnamon

1 banana

3tsp peanut butter

1. Add the oats to the water and boil for 3-4mins, until gloopy. Stir in the peanut butter and cinnamon. Serve with chopped banana.

IMG_1580 IMG_1579

Exam Fuel: The Foodie way

Exam Fuel: The Foodie way

I might be going slightly mental during finals. Not only have I used it as an excuse to blow the student budget on nutritionally balanced exam fuel, but I’m also believing any bullshit I read on the internet. For example, because I read that salmon boosts omega 3 I started exam day with smoked salmon and cream cheese on a toasted onion bagel and home pickled dill, juniper and peppercorn cucumber. (my new favourite quick and simple tasty recipe)

Image

I have been eating ship loads of bananas (apparently potassium boosts your brain), peppermint tea (an obscure website says it reduces stress and panic) and broccoli is becoming a staple of every meal since I became convinced by the rather obviously named super foods.com, that it is a superfood. (Although I’m not sure its skills at fighting birth defects will be that helpful right now). I’m addicted to Pret sea salt dark chocolate, it apparently reduces stress, using pistachios in several of my meals, protein brain boost, and eating mountains of cherries, they help you sleep? 3 down, 1 to go…

So here are a few brain boosting, superfood filled, fuller for longer meals…. when I finish I’m eating cheesecake.

Cucumber Pickle

1. Use a vegetable peeler to make thin strands of cucumber, discarding the centre (or eating it). Scatter over crushed peppercorns, 4 juniper berries, large pinch of salt, chopped dill, 2-3tsp sugar, a splash of lemon juice and 200ml white wine vinegar. Shake, leave overnight. Eat

ImageImage

Salmon, pistachio basmati rice, lemon and dill sauce and steamed broccoli for 1

1. Take the salmon fillet out of the fridge. Put 50g basmati rice in a pan over a medium heat. Add 1tsp Garam Masala, leave for 1min. Add boiling water and 1 vegetable stock cube and whisk till dissolved. Leave for 10 mins or until a lot of liquid has evaporated but there is still a little left. Stir in 10-12 pistachio nuts, unsalted. Cover and set aside.

ImageImage

2. Chop 2 garlic cloves into small pieces. Fry in 1/2tsp oil for 2-3mins. Add pepper and 3-4tbsp lemon juice. Add 1/2 stock cube and 250ml water. Bubble till reduced by about half. Whisk in 2 light mini Philadelphia tubs till combined. Reheat and add a large handful of chopped dill, season to taste.

ImageImage

3. Meanwhile heat a frying pan over a medium heat NB DO NOT LET IT GET TOO HOT. When hot, add the salmon skin side down, unseasoned. Leave untouched for 5-7 mins till the skin is crispy. (NB mine was quite thick) Turn and cook for a further 2-3mins. The salmon should be a really vivid pink inside and tender, if it is too pale you have over cooked it, if it is still fleshy it is rare, better for a different recipe. Luckily mine was perfect 🙂 Finally steam the broccoli, serve.

Image

I’m not claiming this will get me a first but it certainly sent me into my exam smiling. Image

Smoked Salmon, Creamy scrambled eggs, Sweet roasted peppers, toasted onion bagel

IMG_1562

Usually I am a great advocate of butter, try as I might to be healthy – even I have to admit butter makes everything taste better. In the light of healthy exam fuel I made my eggs with half fat creme fraiche. I am a convert, the creamiest, fluffiest scrambled eggs ever.

1. Chop 1 pepper into strips. Scatter with a pinch of salt. Microwave on high for 5-8mins (I did this the night before).

2. Whisk 3 eggs, pinch of salt, pepper and 1 tbsp light creme fraiche. Microwave for 30secs at a time, whisking between each spurt. BE CAREFUL NOT TO OVERCOOK, the eggs will keep cooking, so set them aside when they are still a bit runny.

3. Toast a bagel, top with the eggs (no butter), strips of smoked salmon, the pepper and a sprigs of dill.

Soy milk porridge, berry compote, salted pistachios

1. Put 50g oats, 250ml unsweetened soy milk and a pinch of salt in a pan. Simmer for 5-6mins, stirring. Pour into a bowl.

2. Put 1 snack pack of blueberries in a pan with 2tsp sugar and 3tbsp water. Simmer for 5mins. Place on porridge with a small handful of salted pistachio nuts. 

Lean Rump steak, light peppercorn sauce, paprika sweet potato chips, lemon and garlic broccoli, serves 1 – 15mins.

1. Chop 1 small sweet potato into thin strips. Scatter with sea salt and paprika. Roast on high in the microwave for 8-10mins.

2. Meanwhile heat a frying pan seasoned with a little salt and pepper. Trim the 200g steak of all visible fat. Chop 2 garlic cloves into thin slices and put in the bottom of a saucepan. Top with an in saucepan steamer and fill with chopped broccoli. Steam for 5mins.

IMG_1548

IMG_1546               IMG_1547

3. Fry the steak for 3-4mins on each side for rare – medium rare. Set aside. Add  2 chopped cloves garlic into the steak pan. Fry for a minute. Add a good glug of cooking brandy (I know I’m off booze for exams but this is medicinal, and the alcohol is burnt off). Sprinkle in 1 crushed stock cube, 1tsp slightly crushed peppercorns and 150ml water. 

IMG_1549    IMG_1550

4. Meanwhile drain the broccoli and garlic. Return to the saucepan with a good dose of lemon juice. Cover off the heat, shake and leave aside. Add 1-2tbsp light creme fraiche to the sauce and stir. Return the steak to the pan with any juices that have seeped out. Leave for a minute. Serve. The steak should be on the cusp of turning pink.

 IMG_1558    IMG_1551

Rare Teriyaki Salmon, garlic, ginger and chilli chickpea mash, Coriander leaves, crispy chilli broccoli.

1. Heat a frying pan. Meanwhile pour the contents of a small can of chickpeas in water into a pan (including the water). Add 1/2 small chopped red chilli, seeds removed, 2 cloves garlic, chopped,1/2 a stock cube and 1tsp chopped ginger. 

                            IMG_1566

2. Place 1 fillet of salmon skin side down in the heated pan. Cook for 2-4 mins until the skin is crispy, remove from the pan and set aside. Add 1 large garlic clove, 1/2 small chopped chilli, seeds removed and fry for 2-3mins. Add 4tbsp soy sauce, 1tbsp rice vinegar, and 2tbsp sugar. Leave to bubble.

IMG_1565

3. Take the chickpeas of the heat and mash with a fork. Place 1 chopped garlic clove and 1 small chopped chilli, seeds removed and some broccoli  to a pan, fry for 1-2 mins. Add a small amount of boiling water and leave to steam.

4. When the teriyaki sauce has reduced by a third, add the salmon flesh side down. Leave for 1-2mins (for medium cook for a further 2mins – I like my salmon rare in the middle in this dish but not raw. The colour of raw salmon but not the texture).

IMG_1574

5. The broccoli water should have totally evaporated and the broccoli should be soft. Serve the salmon on top of the chickpea mash, scattered with coriander.

                                                      IMG_1571

Easy Creamy Garlic pasta (Microwave meal for one)

Easy Creamy Garlic pasta (Microwave meal for one) 

I am aware that the amount of meals for one on my blog at the moment does make me look a little bit like a loner but I’m afraid that is what finals does to you. Is it bad that the evening meal has become the highlight of my day amidst drowning in a sea of books, papers and opera dvds? Talking of which I should probably make this short and sweet.

IMG_1529 IMG_1530

Ingredients

1/2 aubergine

1 courgette

100g mushrooms

100ml stock

salt/pepper

parsley

3 cloves garlic

lemon juice

50g penne

2 small tubs of lightest Philadelphia cheese


Chop the veg and garlic, place in a microwavable dish. Add the stock and a small amount of pepper and lemon juice. Sprinkle with parsley. Microwave on high for 2-250mins, until roasted. Meanwhile cook the pasta in salted boiling water for 10-12mins. Drain reserving a tbsp of water. Stir the pasta water and pasta into the veg and add the cheese. Enjoy.

Same ingredients, different dish

This time chop the veg, microwave for 20-25mins. Toss with soy sauce, sesame oil, rice vinegar (a bit of chilli if you like it hot) and 2tbsp sugar. Serve with rice or noodles (and if you are feeling particularly healthy money wise) prawns.

Ultimate Challenge: £10, one person, microwave (and hob), 20min decadent menu

Ultimate challenge: £10 student microwave (and hob) 20min menu 

I’m not sure you are technically allowed to review yourself when writing a blog but having addressed the ultimate  challenge for any student. You have finished a module of your exams, you want to treat yourself but all your friends are still busy. You can’t really afford (nor would you want to ) to eat alone in a restaurant and you only have a microwave. On top of that your fridge is the size of a shoebox and you can almost guarantee that anything left in it will go off before it has been worth the money you paid for it, plus you are trying to be relatively healthy but are pretty damn hungry. You also (in this woman’s case) have recently purchased a ridiculous amount of amazing bordeaux wine for only £3 a bottle,  what is the point of going out anywhere.

Yes I was lucky to find the £4 rump steak (reduced from £5) but otherwise….and it is £10.41 but who is counting!!!!

Ingredients

2x Mussels in white wine sauce (save one for later) – £2.99

4x bread rolls (3x lunches for the week) – £0.69

Rump steak 200g – £4

1x sweet potato (save half for later) – £0.49

Asparagus bunch (save half for later) – £0.49

1 muller light coconut and lime yoghurt – £0.69

4x lightest cream cheese individual packs (save 1 for later) – £1.00

6 large eggs (save 5 for later) – £1.15

1 snack pack Belvita breakfast biscuits – £0.50

IMG_1476       IMG_1477

20:00 Whisk together 1 egg, yoghurt and cream cheese until smooth.

19:00 Pour into a microwave proof dish. Chop the sweet potato into thin strips (the thinner they are the better they work).

18:00 Chop the asparagus and place in a saucepan with a pinch of salt. Season a frying pan with salt, pepper and a very small drizzle of oil. Place on a high heat to heat up.

17:00 Meanwhile place the cheesecake in the microwave covered in a small piece of paper towel. Microwave on high for 1min, it should be mostly cooked. Microwave in 20sec bursts until cooked in the centre. Crush the biscuits into crumbs and sprinkle over the top, refrigerate.

16:00 Put the mussels in a saucepan to heat up (roughly 4 mins). Place the bread roll in the microwave on a low heat for about 45s    ec to warm up. Put the steak on to fry, roughly 2mins on each side for medium rare.

12:00 Cover the steak in foil and put aside to rest. Sprinkle the potatoes with salt, pepper a small drizzle of oil and smoked paprika. Put in the microwave on medium high for 10mins. Meanwhile eat your mussels and crusty warm bread.

     IMG_1478        IMG_1479

02:00 Boil water and cook the asparagus for about 2mins. Turn the microwave to high and cook the potatoes for a further 2mins.

00:00 Serve. Eat cheesecake after.

IMG_1480