A Rose by any other name…..

So here it is. The last proper day of my holidays and with it the last single lunch review I will be doing for a while. Next week whilst I am not going back to school after a luxurious week of holiday – yes I did spend most of this week sleeping- I am off to intern at Delicious Magazine in hope that sometime in the next ten years they might have an opening for a job…. Unfortunately I have realised that much as I am enjoying a weekly solo lunch adventure there is simply not enough restaurants in Oxford that are independent and affordable and also I’m lucky enough to boast that my social engagements have overtaken the ability for time to myself. I’m aware this isn’t a bad thing. Of course I’ll still be reviewing. There is a rather favourable review of a Hampstead Heath gastropub on its way, a date with my ex housemate, watch this space. 

At least I’ve chosen a rather nice way to finish the holidays. It is a beautiful day in Oxford. It’s cliche, but the architecture in Oxford does seem that bit more impressive against a clear blue backdrop. It’s as if those grey rainy days were merely a rehearsal for the really performance. It’s just a shame that this often feels like a once a year show. I’ve whipped out my new sunglasses, I’ve dusted off my spring coat (let’s not get ahead of ourselves, we are still in England, a coat is necessary) and I’ve headed to The Rose. A staple of the Oxford afternoon tea scene, I happened to come across a review which said it was the best lunch in Oxford. However as I sat for a rather late lunch in the window basked in sunlight, people watching the street, my heart sank when I looked at the menu. The goats cheese salad whipped into memory a weedy limp salad leaf attempt from a health care I’d had a few weeks ago. The ciabatta sandwich options suggested the dry thin offerings from various sandwich outlets around and reminded me why I never order ciabatta if offered. The £6.95 charge for a plate of ‘home cured salmon’ which sounded suspiciously like 3 slices of Sainsbury’s finest laid on a plate, taking barely 5minutes to eat. But…..I am prepared to stand up and admit how wrong I was. Just to be clear. This is the place that all the aforementioned cafes should take their cue from. This is the place where the menu doesn’t lie. In case you need it in bold letters BEST LUNCH IN OXFORD.

  
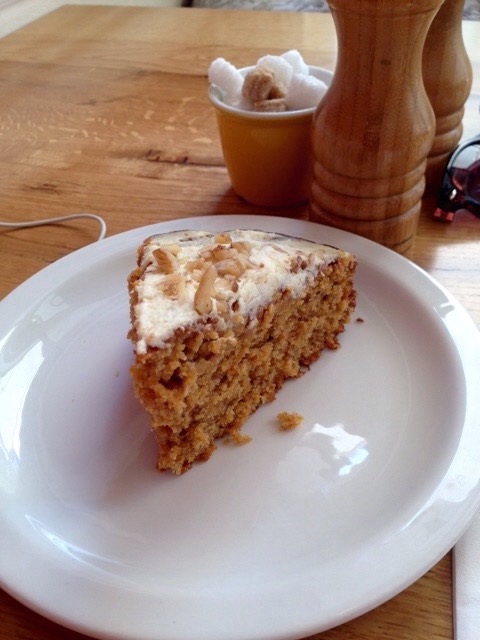
I chose the home cured salmon and asked for some bread and butter on the side with some trepidation as the only offering for bread was ciabatta. I sat undisturbed for an hour and a half reading The Versions of Us (an excellent book by the way) and enjoyed a large salad plate, loaded with salty gravlax trimmings with dill. Pesto and an excellent shallot dressing. It was accompanied by warm, soft ciabatta and excellent creamy yellow butter. I could well have eaten a couple more rolls. I don’t eat bread a lot but when it tastes that good…. I consoled myself that I only had the one ciabatta by ordering some cake. Again I’m not usually that into cake, I prefer a bar of chocolate or a creamy dessert if I’m going to treat myself but I thought if the bread is that good and they call themselves an afternoon tea shop, the cake is probably pretty damn good. I was not disappointed. An incredibly moist carrot cake studded with walnuts with the thinnest spreading of tangy cream cheese icing cutting through the sweetness but without making the cake too rich. My only criticism is that the staff could have been a little more attentive especially as I was only given a small glass of water which I finished pretty quickly and had to keep waving to try and get refills despite the cafe being pretty quiet at this time. But it’s only a little thing and mostly the staff were friendly and helpful and clearly knew the dishes which is always a bonus. And for a total of £12, I will certainly be coming back. 


Exam term Medicine: GF/DF Chocolate Cake with Marshmallow frosting

Exam season has hit Cambridge. Even those of us who haven’t got exams can feel up in the air, or is that just the dismal weather. Remember back in April when the sun was shining? No me neither, we do live in England after all. Not only is the atmosphere pretty grim, but extra curricular and social activities have dropped to virtually nothing. Other than a housemate trip to the very English ‘Cambridge Beer Festival’ things are pretty quiet. Im aware I am making myself incredibly unpopular to those with exams by keeping myself busy with Sudoku puzzles and the like, so I thought I would cheer them up by making a cake. As it is a cake for the choir, it is of course Gluten and Dairy Free for the Gluten and Dairy Free boy. I also thought it would be a bit more fun if I made it in the shape of book, specifically the book that is pretty much the foundation of knowledge for any music student. That way the music students can get a kick out of literally devouring their revision.

Cake

600g ground almonds

6 eggs

100g cocoa powder

2tsp bicarbonate of soda

2 tsp baking powder

4tbsp honey

200g sugar

2tsp vanilla extract

Large pinch of sea salt

4tbsp water

Marshmallow Frosting

3 egg whites

300g sugar

Vanilla extract

  1. Preheat the oven to Fan 180*c and line a 20cmx15cm baking tray.
  2. Whisk the egg, sugar, vanilla, honey and salt together. Meanwhile combine all the remaining dry ingredients. Mix the two bowls together and add water to thin the mixture a little.

  3. Cook for 15-20mins in two batches, until set and a spatula comes out clean.

  4. Meanwhile make the marshmallow icing. Whisk the egg whites to stiff peaks. Meanwhile heat the sugar with a splash if water until it becomes a clear, bubbling liquid. Pour into the egg whites whilst still whisking. When all the syrup is combined, keep whisking for 4-5mins. Spread or pipe onto the cake, using some to sandwich the cake and some to ice the cake.

NB If you want to recreate the book, use ready to roll icing and roll between to sheets of grease proof paper to get a thin sheet without sticking to the rolling pin.  


Blue Velvet Cake

My colleague Molificent and I came upon the topic of cakes the other day (you would have thought this topic came up a lot given I work in a cafe but apparently not so much) and I began wondering, as only the mind of someone staring at cake all day can, why we have red velvet cake. Why not other colours? Admittedly a green cake might put us off our food, but why not a blue cake. Unnatural yes, but then what is natural about the vivid red hue of a true red velvet cake? To be terribly British of me, it is the epitome of the difference in cuisine between Americans and English. The English like basic, traditional stodge and couldn’t care less if it was plated up. The Americans like exciting colourful reinterpretations of the classics like cake pops and whoopie pies (stereotyping I know but this is a food blog post not a political argument). So I scoured the internet for Red Velvet Cake recipes. I discovered that unfortunately the cocoa was essential for more than just flavour. The chemical reaction between the cocoa, bicarbonate of soda and red food colouring was what increased the intenseness of the red colouring. How was I meant to recreate this given that there is no such thing yet as a white chocolate cocoa powder. Molificent suggested investing in a dehydrator, but firstly I can’t afford another slightly unnecessary kitchen implement, secondly it wouldn’t have the same effect as cocoa as the whole point of cocoa is the lack of dairy or sugar and finally my housemates wouldn’t let me buy anything more that might clog up our kitchen surfaces. So instead I upped the bicarbonate of soda to increase the acid levels to supplement the acid in the cocoa and added white chocolate pieces to add a white chocolate flavour in lieu of the cocoa flavour. The result was the moistness of a red velvet cake with the overwhelming sweetness of a white chocolate cake (NB this recipe is for the sugar addicted only). My only regret is that I didn’t add enough blue food colouring so the resulting cooer of the cake was too green, for future reference, a whole bottle of blue gel food colouring will be needed.

IMG_1500

Blue Velvet Cake


120g Butter
300g caster sugar
2 large eggs
Bottle of Blue food colouring gel
1tsp Vanilla extract
350g Plain white flour 
1tsp Sea Salt
240ml Buttermilk
1tbsp White wine vinegar
2.5tsp Bicarbonate of soda
150g white chocolate, finely chopped

Icing

100g Butter 
600g Icing sugar 
250g Cream cheese full fat
2 tbsp lemon juice

  1. Cream the butter and sugar together, add the eggs and vanilla extract, beat well. Add the flour, food colouring, salt, chopped chocolate and buttermilk, mix.
  2. In a cup mix the vinegar and soda and immediately add to the cake mix. Pour immediately into two prepared sandwich tins.

  3. Bake in the oven at 180oC for 30-40mins until a skewer comes out clean. Leave to cool COMPLETELY.

  4. Meanwhile mix the WELL SOFTENED butter with lemon juice and icing sugar together. When beaten, add the cream cheese. Spread onto the cooled cake as a a filling and topping. Serve.

IMG_1515

IMG_1516

A Night at the Opera

Next on tour of French Patisserie is a classic combination of coffee, chocolate and cream (the French Tiramisu) and a homage to my other passion, the Opera cake. This cake is technically difficult but melts in the mouth, when made correctly, and is almost as tasty as Tenor Jonas Kauffmann (Exhibit A https://www.youtube.com/watch?v=RzLR1OuDaKY&list=PL4_Y5duTlUpkLbLPRZ16uNo1Xxo_Fcr8Z). It was made famous in the 19th century by French Patissierie Dalloyau, which just so happens to be in the shadow of the Opera Garnier the building on which the pastry is based on. I assume that the many decadent layers of the cake are meant to mirror the decadent layers of the Opera Garnier. I should hopefully end up with perfect contrasting cream and brown layers with a smooth, shiny chocolate ganache on top.

Garnier Opera 5operacake

The First Challenge is the Almond sponge, I found the key here was to be very gentle with the mix, especially folding the egg whites, be very accurate with the measurements and trust your oven (i.e don’t open the door too early during cooking or the cake will sink). I also made this sponge mix in two batches (I only had one tin and didn’t want the mixture to deflate too much between cooking, of course if you happen to have 4 swiss roll tins lying around handy, you’re fine.)

Almond Sponge (serves 10)

150g icing sugar

5 tbsp flour

pinch of salt

140g ground almonds

1tsp vanilla extract

6 eggs

30g butter, melted and cooled

6 egg whites

2tbsp caster sugar

1. Mix the icing sugar, flour, salt and almonds together. Whisk in the eggs one at a time slowly before adding the vanilla. Then add the butter.

2. Whisk the egg whites to soft peaks, (you should be able to turn the bowl upside down on your head without the eggs falling out – I greatly enjoy doing this to other people). Add the sugar carefully and whisk to shiny peaks. Mix 1/3 into the almond mix, whisking together. Fold (using a metal spoon in a folding action) the remainder of the egg whites into the mix.

3. Spread a thin layer onto a lined swiss roll tin (34.5x 24.4cm). Make sure to use a palate knife to spread the mix to the ages, but try not to overwork it or it will lose the rise. Bake at 220oC for 6-8mins, until golden brown. Turn out onto a wire rack to cool. Repeat 4 times.

IMG_2066

For the Coffee Syrup

300ml water

150g sugar

3tsp expresso powder (I also like to add a drop of vanilla extract)

1. Stir the ingredients together until dissolved over a low heat, bring to the boil, boil for 1-2mins, remove from the heat.

IMG_2074

For the Coffee Buttercream

4 egg yolks

150g sugar

40ml water

pinch of salt

300g butter

2tsp expresso powder dissolved into 2 tsp boiling water

1. For this recipe you really need a kitchen aid (no-hand mixer) or a hand held electric whisk (but you may need help). It’s quite hard to do it without… Whisk the 4 egg yolks on high for 5mins until light and creamy.

IMG_20692. Meanwhile heat the sugar, water and salt in a pan until boiling. Boil until you get a clear syrupy consistency (roughly 115oC).

3. Immediately pour into the egg yolks little by little, like making mayonnaise, while the mix is still mixing. Add a bit then whisk some more and repeat. You should end up with a lighter pale mousse consistency. Keep whisking until cooled to room temperature (feel the sides of the bowl, if it is too warm the butter will melt into the mix and you won’t get the desired consistency.)

IMG_2070

4. Add the butter bit by bit and whisk until you get a white creamy mix. Add the expresso, cooled.

IMG_2071        IMG_2073

For the Ganache

100g dark chocolate 

15ml cream

60ml whole milk

(optional: 20ml white rum)

50g butter

1. Chop the dark chocolate finely and pour into a bowl. Heat the cream, (rum) and milk together and bring to the boil. Immediately pour over the chocolate and leave for 2-3mins. The chocolate should have melted. Mix to a smooth melted chocolate consistency if need be add more dark chocolate to achieve desired consistency and blast for 5-10secs in the microwave at a time to heat a little, before beating to melt. When chocolate is melted add the butter and mix till melted. Leave to cool to a spreadable consistency.

IMG_2077

For the Chocolate Glaze

200g dark chocolate

60g butter

1. Melt chocolate and butter together. Reserve some in a piping bag to pipe.

To Construct

1. Take 1 of the sponges. Lay down with the non-parchment side facing up. Temper 150g chocolate. (Melt at 20 sec intervals until almost all is melted – there should be a few lumps, take out and stir till all the lumps have melted = easy tempered chocolate). Spread this over the sponge in a thin layer, then leave to set in the fridge for 5mins (you don’t want it completely hard). Flip onto a cake board/whatever you want to serve the cake off. The chocolate bottom will make it easier to take the slices off the board later.

IMG_2075      IMG_2067IMG_2068

2. Soak the first sponge with coffee syrup, the more the better, but make sure to dab not pour the syrup over or you will just end up with a disintegrated sponge. Apply your first layer of buttercream, using a palate knife to smooth it down to about 1/2 cm thick.

IMG_2076

3. Top with the next sponge, parchment paper up. Remove the parchment paper and soak with coffee syrup. (NB you may want to refrigerate the cake between layers if your kitchen is very hot. But the buttercream will have to sit out a little so it can be spread.

4. Spread with chocolate ganache, then top with the next sponge and soak with syrup. Spread with more buttercream, top with the final sponge and soak with syrup.

5. Finally spread one more layer of buttercream, thinner than the others. This is mostly just to make the top smooth and fill in the cracks.

6. Finally pour over the glaze, spread evenly and quickly (mine wasn’t as even as I would’ve liked and the key is speed.)

IMG_2079

7. Let set for a little, then take a serrated knife and cut down each side to trim the edges. Keep refrigerated till served.

IMG_2085IMG_2084

Dustbin Tales

Dustbin Tales
            A good friend of ours is one of my favourite types of people, the sort of person who will eat anything. I cannot stand fussy eaters. (I know I contradict myself a bit on this because of not liking cheese but you know what I mean) So of course I am always delighted when he comes round to dinner or drinks and I can palm of some of my latest invention on him. He is always a grateful receiver of any cookies, brownies or cake that are left lying round the house which I baked as a stress reliever and can’t persuade any of our family to eat any more. So I was delighted when I was asked to cater his 21st birthday. I had absolutely free reign on a savoury and sweet canapé spread; I could experiment with mini macaroons, cheesecake bites, three different sorts of dip and mini toad in the hole. I made mini satay chicken, white wine jellies, chargrilled squid and mini apple pies. Most of all I got to make a spread sheet to organise the whole thing – brilliant! The only request was that I make a cake like the one his mum made for him every year for his birthday.

            As I mentioned before this friend was famous for eating everything, so his mum had come up with a dustbin cake. A chocolate cake with the top sliced off, topped with all the disgusting gummy sweets he wasn’t allowed most of the year and then the top of the cake placed over them. Now I wanted to go one step further for this cake. So I planned a 4 layer chocolate cake, of which I cut out a hole in each layer. I filled the hole with gummy sweets, smothered the cake in chocolate icing with a few token gummy worms making their exits down the sides and topped the whole thing off with a pure chocolate disc lid. On this lid I piped lines coming off the centre and added on a fondant handle and there you have it a pure chocolate dustbin. I was later told that this was breakfast for weeks afterwards, ah well better to over cater than under….

Beer Cake: The Yorkshireman

Beer Cake: The Yorkshireman

The Yorkshireman’s birthday approaches. I am invited to a lavish champagne (okay prosecco) drinks reception followed by a meal at Brown’s. So what to give him….. When I have time (unfortunately this is not the case for all of my friend’s birthdays so I apologise – if any of my friends are reading this I promise you, your time will come soon – ) I like to make a cake and/or chocolates. The Yorkshireman is another one of my keen organist friends but since I have already made the organ cake, I turned to the Yorkshireman’s other love, Beer. I made a sheet plain sponge, first time using the brand new bright red kitchen aid!


4 Large Eggs
225g sugar
225g butter
1 Tbsp Vanilla Extract
225g self raising flour
pinch of Salt 
milk to loosen

Beat the butter and sugar till fluffy, add vanilla and eggs. Add flour and salt (TOP TIP: beat on a slow setting first unless you want flour all over your work surface). Add milk until the mixture is still thick but is pale and light. Bake at 180oC for 30mins or until golden on top and cooked through (use a skewer, if it comes out clean.

before carving the sides to resemble a beer glass.  Then I made some salted caramel icing

200g sugar
2tbsp water
60ml cream
250g butter
300g icing sugar
Vanilla extract
2tsp sea salt (proper flakes)

Let sugar and water dissolve over a medium heat and  DO NOT STIR. Leave till it turns to a dark amber and is beginning to smoke, you can swirl it but DO NOT STIR. Take off the heat, leave for 30secs then add the cream and stir. Leave to cool till roughly room temp. Meanwhile cream the butter, vanilla and salt. Add the icing sugar (see flour tip) then half the cooled salted caramel, if too thick add water, refrigerate till needed. 

Then I smothered the cake with the remaining salted caramel before covering the whole thing in the icing. Finally I made some marshmallow frosting

1 egg white
100g sugar or 150g icing sugar

Beat the egg white till stiff peaks form. Slowly add the sugar and continue beating till stiff peaks form again and the mixture is thick enough to pipe, put in a piping bag.

Then I piped the icing on top to make the head. The final decoration was melted milk chocolate put in a piping bag which I piped on to try and emphasise the point…. Next time I promise it will be guiness made with Guinness chocolate cake


Organ lessons

Organ lessons

My friend (who happens to be an organist) turned 21 yesterday. His sole wish was to have champagne and smoked salmon on his birthday (you can probably see why we are friends). So of course I selflessly obliged him in drinking his champagne and going for both lunch and dinner with him (loch fyne and cote since you ask) and had a wonderful evening. But what do you give the foodie organist ? an organ cake of course.
Using the time in my latest Early music lecture efficiently I planned a cake with a little help from another organist for authenticity. I figured a proper large pipe organ was a little ambitious so went with a chamber organ. One thing I am struggling with at uni is the lack of food processor (I know, middle class problems) so my chocolate cake ended up with small chunks of chocolates rather than the smooth texture I was expecting but that was a surprisingly tasty addition which I could easily pass of as an intentional clever twist. After making my two square shaped chocolate cakes I cut one in equal halves, and one with a slightly small half so that there was a ledge at the bottom for the seat. Then I levelled each one so that they had flat tops and square edges and sandwiched the layers together with strawberry jam.

After that I covered the whole cake in strawberry jam which stops the icing from getting all crumby when you spread it over and also gives a nice tang to the cake (I didn’t necessarily realise this would happen but on tasting it was pretty good). Finally I covered the whole cake in buttercream chocolate fudge icing, added a Caramac? (me neither) as a music stand, a Twix as the seat, iced a keyboard and pipes on the back and it sort of looked like an organ. Although it’s a good thing my artwork gets eaten almost immediately


Ferraro Rocher Cupcakes

I admit that I do not post enough sweet recipes to this blog despite having an intensely sweet tooth (I would always pick pudding over starter). I love making desserts – desserts is my favourite part of the meal because they give you the scope to be the most creative. You can mix sweet and savoury, you can shape almost anything (see the cake section), there are never constraints what you have to put on the plate and most of all it can have chocolate in it. Desserts are works of art and taste bloody good – I’m afraid this is why I believe food is a much higher form of art than a one off effort on a painting in the Tate modern. Plus I am pretty sure someone will soon come out with proven scientific research that baking is the most effective form of stress release and antidepressant.  So here is a decadent cake for a chocolate lover, not only is it beautiful but it combines probably every good thing god created (minus peanut butter and champagne) plus it has gold leaf on it, who wouldn’t eat anything with gold leaf on it?

Ferraro Rocher
Vanilla Cupcakes, Filled with hazelnut cream, a layer of chocolate, boiled milk nutella frosting with hazelnut pieces, drizzled with white and milk chocolate, sprinkled with wafer and topped with gold leaf.
For the Cupcakes
225 grams granulated sugar
1 vanilla pod
175 grams cake flour, not self-rising (Available in the UK only from American food shops)
1 ½ teaspoons baking powder
½ teaspoon bicarbonate of soda
pinch of salt
57 grams unsalted butter, room temperature
2 large eggs, room temperature
75 grams full-fat sour cream
60ml vegetable oil
1Tbsp vanilla extract
160 ml whole milk
1.Preheat oven to 350 F/175 C.
2.In a small bowl, combine sugar and seeds from the vanilla pod.
3.Using the back of a spoon, move around the bowl and apply pressure
to break up any clumps of seeds and to better infuse the vanilla flavor into the sugar. Set aside.
4.In a medium-sized mixing bowl or bowl of a stand mixer, mix together
cake flour, baking powder, bicarbonate of soda, and salt.
5.Add the vanilla sugar and mix until well combined.
6.Add butter and mix on medium-low speed for three minutes.  Because
there is so little butter, you’ll end up with a very fine crumb texture.
7.In a small mixing bowl, whisk together eggs, sour cream, oil, and
vanilla extract until smooth.
8.Add the egg mixture to the flour mixture and beat on medium speed
until just combined.
9.Slowly add milk and mix on low speed until just combined.  The batter
will be liquid. 
10.         Fill cupcake liners just over 1/2 full.
11.         Bake for 14 minutes and then test to see if they are done. They
are done when a toothpick comes out without wet batter stuck to it.  The cupcakes should appear white with specks of vanilla bean. They should not turn a golden brown.  If they are not done, test again in two minutes.  If they are still not done, test again in another two minutes.
12.         When the cupcakes are done, remove them immediately from the
tins and leave them on a cooling rack to cool.

For the Filling
240ml Whole Milk
2.5 Egg Yolks
55g Sugar
55g Cornstarch
2 teaspoons Hazelnut Liqueur
1.    In a medium saucepan, whisk together milk, egg yolks, sugar and cornstarch.
2.    Place over a low heat whisking gently just until the mixture bubbles, about 15 minutes. Immediately remove from the heat. Strain through a fine mesh sieve into a large bowl. Stir in hazelnut liqueur.
3.    Press plastic wrap directly on the top of the cream and place in fridge to cool completely, approximately 2 hours.
4.    When cupcakes are cool, cut a small hole in the centre of the cake and fill with the filling.
For the Chocolate Layer
100g melted milk chocolate
1. When the cupcakes are filled, pour over a thin layer of melted chocolate and leave to set, meanwhile make the icing.
For the Frosting
240ml Whole Milk
3 tbsp Plain
A pinch of Salt
225g unsalted Butter
225g Granulated Sugar
1tbsp nutella
2tbsp hazelnuts, finely chopped
1.    Whisk flour into milk and place over medium heat in a small sauce pan. Cook mixture until thickened, whisking constantly.
2.    Remove from heat and whisk in the Salt.
3.    Pour into a clean bowl and cover with plastic wrap on the surface. (This will stop the cooking and the plastic will prevent crusting) Set aside to cool slightly.
4.    In a stand mixer, begin creaming the butter and sugar until fluffy.
5.    When milk mixture is slightly cooled; add 1 TB at a time to the creamed butter mixture while the mixer is running on medium speed. Slowly but surely the gluten will pull in the butter into a pseudo emulsion. Add the nutella and mix again.
6.    You should have an extremely fluffy, light and buttery frosting when completed
7.    Toast the hazelnuts dry. When cooled, stir through the frosting
8.    Place in a piping bag and pipe onto the set chocolate
To finish
Wafer crumbled
Melted milk chocolate
Melted white chocolate
Gold leaf
1.    Top the cupcake with the wafer pieces
2.    Drizzle the melted milk chocolate and white chocolate over the cupcake in lines
3.    Finally dab a piece of gold leaf on top